
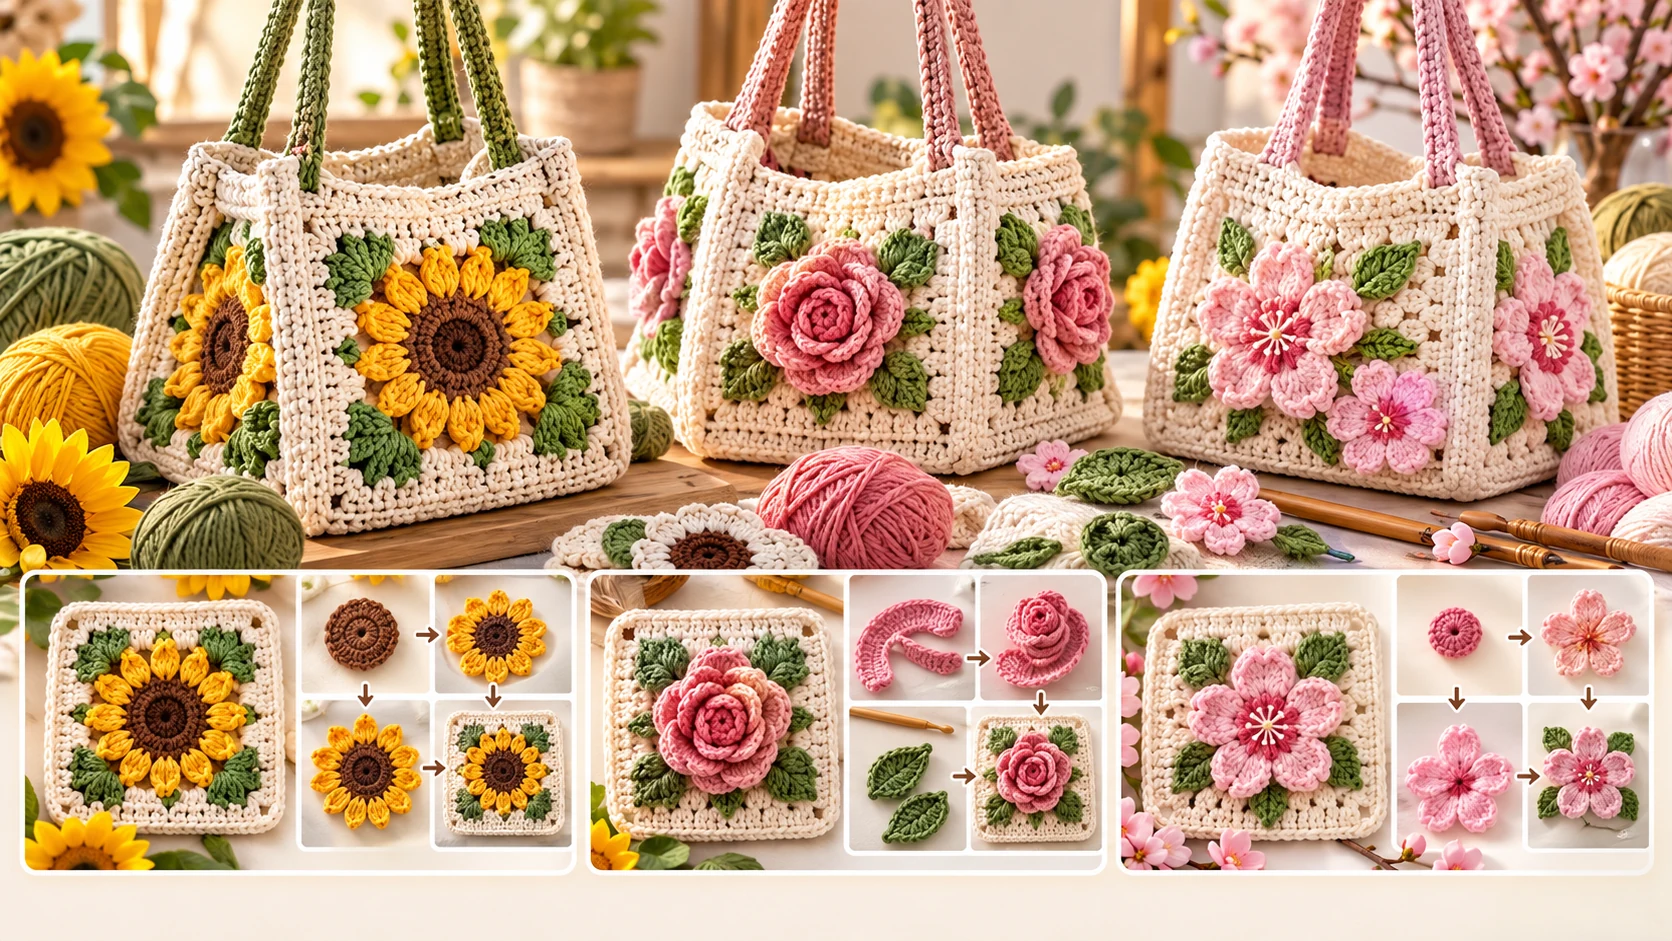
There is something especially beautiful about combining classic granny squares with dimensional crochet flowers.
A floral granny square bag can be colorful, practical and completely customizable—and once you understand the basic construction, the same bag shape can be transformed into dozens of different designs.
In this free crochet guide, you’ll learn how to make three floral granny square bag patterns using the same basic tote construction:
Sunflower Granny Square Bag, Vintage Rose Granny Square Bag, and Cherry Blossom Granny Square Bag.
Each version has its own flower motif, color palette and personality, but all three use the same simple idea: crochet individual squares, block them to the same size, join them into panels, add a firm base and finish with sturdy crochet handles.
The finished bag is approximately 10¼ × 10¼ × 5 inches (26 × 26 × 13 cm) before the handles, although you can easily change the size by adjusting your squares.
This pattern uses U.S. crochet terminology. The Craft Yarn Council standard abbreviations use terms such as ch for chain, sc for single crochet, hdc for half double crochet, dc for double crochet and tr for treble crochet.
If you’re still learning the basics, you may want to review How to Make a Slip Knot for Crochet before beginning. Slip Knot Crochet Tutorial
Floral Granny Square Bag Pattern at a Glance
| Detail | Pattern Information |
|---|---|
| Skill level | Confident beginner to intermediate |
| Terminology | U.S. crochet terms |
| Construction | Individual motifs joined into a tote |
| Recommended yarn | Medium-weight cotton or cotton blend |
| Hook | 4.5 mm crochet hook |
| Granny squares | 12 |
| Square size | Approx. 5 in / 13 cm after blocking |
| Finished width | Approx. 10¼ in / 26 cm |
| Finished height | Approx. 10¼ in / 26 cm |
| Finished depth | Approx. 5 in / 13 cm |
| Handle length | Approx. 22–24 in / 55–60 cm |
| Approx. yarn | 700–900 yd / 640–825 m total |
| Optional additions | Fabric lining, magnetic snap, base insert |
For bags, a firm fabric is useful because it helps reduce excessive stretching. Your exact yarn, tension and hook combination matters more than simply matching a hook number, so concentrate on reaching the finished square measurement consistently.
The Craft Yarn Council also recommends checking gauge rather than relying only on the hook number printed on a yarn label.
Crochet Abbreviations
| Abbreviation | Meaning |
|---|---|
| MR | Magic ring |
| ch | Chain |
| sl st | Slip stitch |
| sc | Single crochet |
| hdc | Half double crochet |
| dc | Double crochet |
| tr | Treble crochet |
| st / sts | Stitch / stitches |
| sp | Space |
| BLO | Back loop only |
| FLO | Front loop only |
| yo | Yarn over |
You can also check the official Craft Yarn Council crochet abbreviation reference if you come across an unfamiliar term. Craft Yarn Council Crochet Abbreviations
Materials
For one finished bag, prepare approximately 400–550 g of medium-weight cotton or cotton-blend yarn in your chosen colors, a 4.5 mm crochet hook, scissors, a tapestry needle, stitch markers, blocking pins and a measuring tape.
You can also add a fabric lining, magnetic closure or thin plastic canvas base if you want a more structured finished bag.
Cotton works especially well for bags because it produces clear stitch definition and generally feels more structured than very stretchy yarns.
Pattern 1: Sunflower Granny Square Bag
The sunflower granny square bag is the boldest of the three designs.
Golden petals against brown centers create strong contrast, while green and cream keep the finished tote looking warm and natural
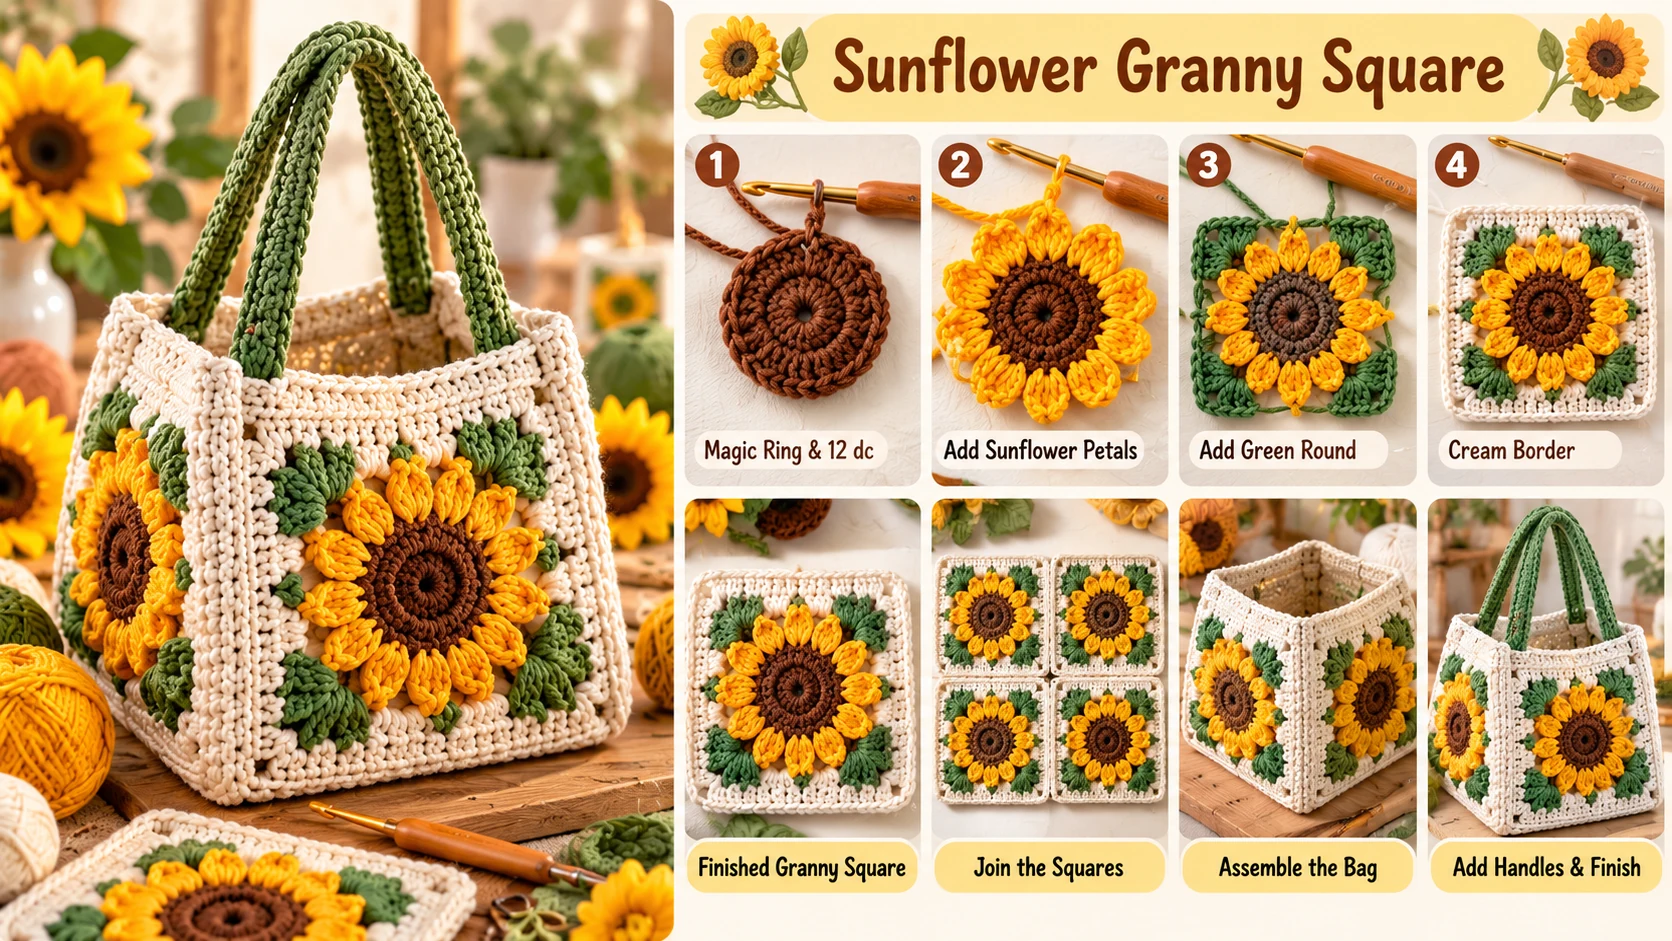
A good palette is:
| Part | Color |
|---|---|
| Flower center | Chocolate brown |
| Petals | Golden yellow |
| Leaves/background | Olive or sage green |
| Square border | Warm cream |
| Handles | Green or cream |
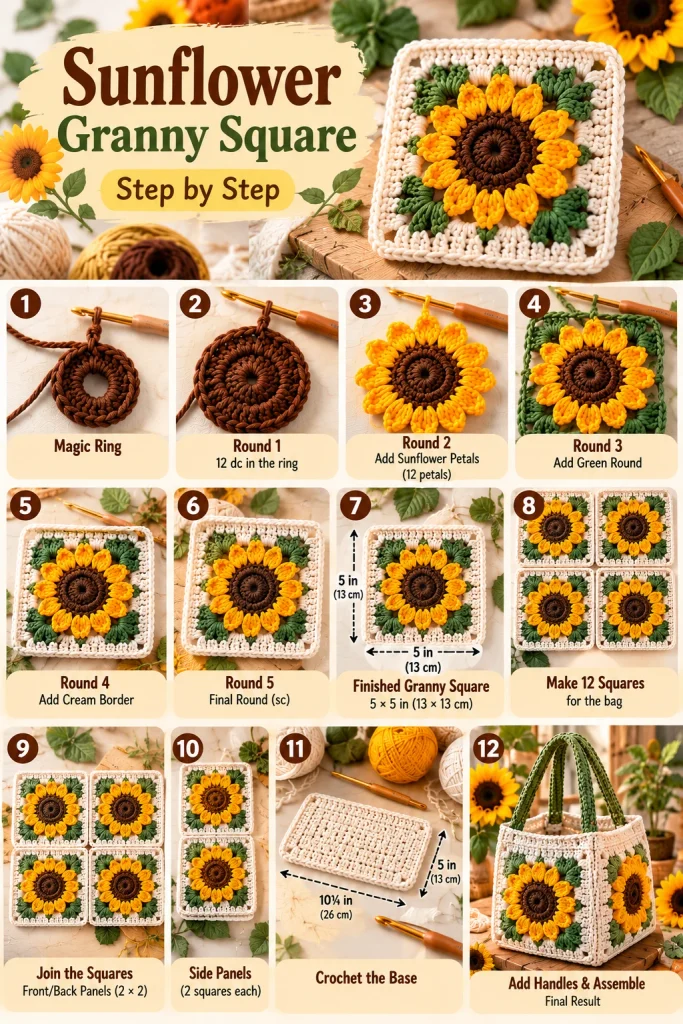
Sunflower Granny Square
Make 12 squares.
Round 1 – Brown Center
Using brown yarn, make a magic ring.
Ch 2.
Work 12 dc into the magic ring.
Pull the yarn tail to close the center.
Join to the first dc with a sl st.
You should have 12 dc.
If you need extra help working from the center outward, your existing guide to crocheting circles explains the basic principle clearly. How to Crochet a Circle
Round 2 – Sunflower Petals
Change to yellow yarn.
Work this round through the front loops only, leaving the back loops available for the next round.
In each stitch around:
sl st, ch 2, dc, tr, dc, ch 2, sl st
Repeat around until you have 12 petals.
Fasten off the yellow yarn.
Treble crochet gives the petals extra height. Beginners who need a refresher can use the existing treble crochet tutorial on Crochet Coach Online. How to Treble Crochet
Round 3 – Green Square Foundation
Join green yarn into one of the unused back loops from Round 1.
Work:
hdc in next 2 back loops
Then:
(2 dc, ch 2, 2 dc) in next back loop
Repeat this sequence four times around.
The four ch-2 spaces become the corners of the square.
Join with a sl st.
Round 4 – Cream Border
Change to cream.
Move to a corner space.
In each corner work:
2 dc, ch 2, 2 dc
Work 1 dc in each stitch across each side.
Repeat around all four sides.
Join.
Round 5 – Firm Outer Edge
Ch 1.
Work 1 sc in every stitch.
Work 3 sc into each corner space.
Join and fasten off.
Block the square to approximately 5 × 5 inches / 13 × 13 cm.
If necessary, add one additional round of sc to reach the target measurement.
What the Finished Sunflower Square Should Look Like
The flower should sit slightly above the green foundation rather than lying completely flat. The cream border should form a clean square with four clearly defined corners.
All twelve squares should measure approximately the same size before joining.
Pattern 2: Vintage Rose Granny Square Bag
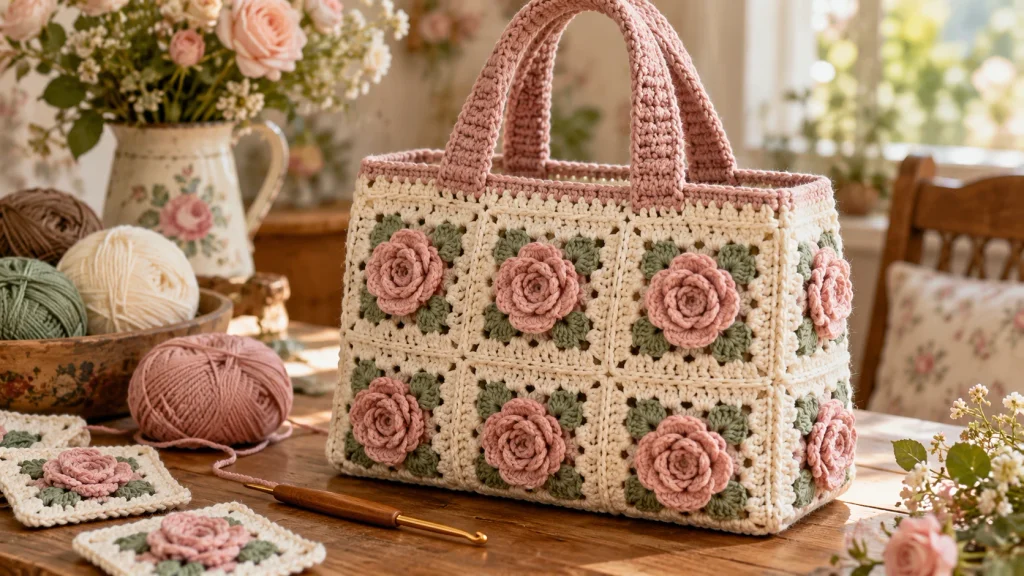
For something softer and more romantic, try the Vintage Rose Granny Square Bag.
Instead of building the entire flower inside the square, this version uses a separate dimensional crochet rose that is sewn securely onto the granny-square base.
This construction makes the rose look fuller without making the entire square unnecessarily complicated.
A beautiful palette is dusty rose, blush pink, sage green and warm ivory.
Crochet the Granny Square Base
Make 12 bases.
Using green yarn, make a magic ring.
Round 1
Ch 2.
Work:
(3 dc, ch 2) × 4
into the ring.
Join.
You should now have four crochet clusters and four corner spaces.
Round 2
Slip stitch to the next corner.
In every corner work:
3 dc, ch 2, 3 dc
Work a small ch 1 between groups.
Repeat around and join.
Round 3
Change to cream.
Continue in granny-square style.
Work:
3 dc, ch 2, 3 dc
into each corner.
Work 3 dc into each side space, separated by ch 1.
Rounds 4–5
Continue with cream until the square reaches approximately 13 cm / 5 inches.
Fasten off and block.
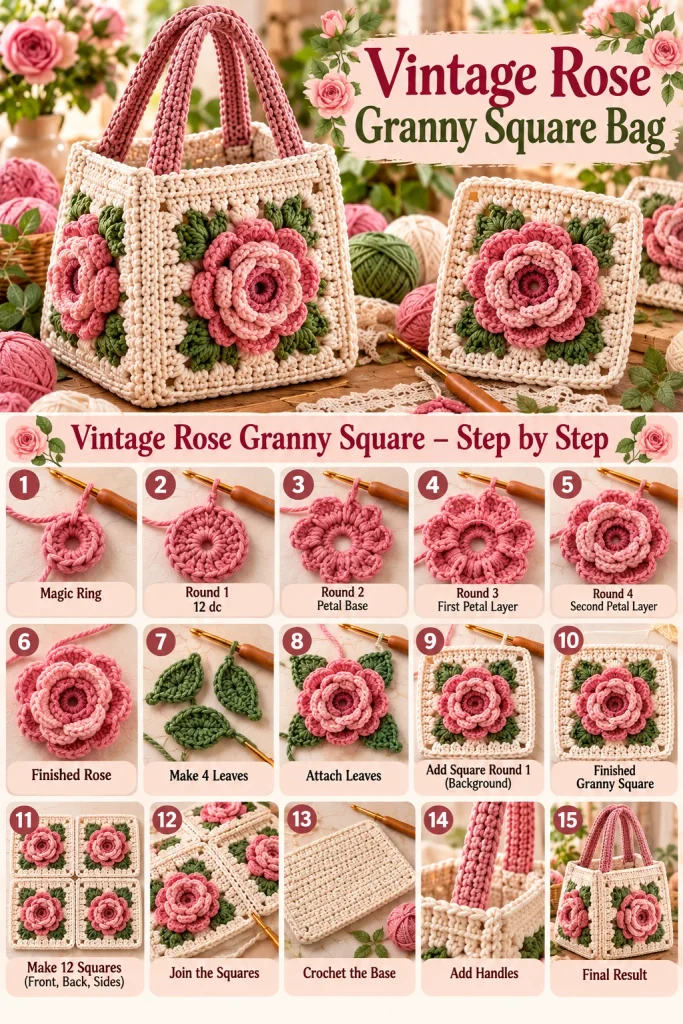
Make the Crochet Rose
Using dusty pink yarn:
Ch 41.
Rose Row 1
Sc into the second chain from your hook and in every remaining chain.
You should have approximately 40 sc.
Rose Row 2
Ch 1 and turn.
Work:
sl st in next st, 5 dc in next st
Repeat across.
The strip will naturally begin to curl.
Fasten off, leaving a long sewing tail.
Starting at one end, roll the strip into a rose shape.
Keep the center fairly tight and gradually loosen the outer layers.
Thread the long yarn tail through a tapestry needle and sew securely across the underside several times.
Do not pull so tightly that the petals collapse.
Crochet the Rose Leaves
Make approximately four leaves per square.
Ch 7.
Starting in the second chain from the hook work:
sl st, sc, hdc, dc, hdc
Work 3 sc in the final chain.
Continue along the opposite side of the foundation chain with:
hdc, dc, hdc, sc, sl st
Fasten off.
Position four leaves around the center of the square, then place the rose over their inner ends.
Sew the leaves first.
Then sew the rose securely through its underside without flattening the outer petals.
Repeat until you have 12 completed Vintage Rose granny squares.
Pattern 3: Cherry Blossom Granny Square Bag
The Cherry Blossom Granny Square Bag has a lighter spring look.
Each flower uses five rounded petals instead of the many layers found in the rose, making the motif easier to recognize even when viewed on a small screen or from a distance.
Use light blush pink for the petals, deeper pink for the flower center, sage green and cream.
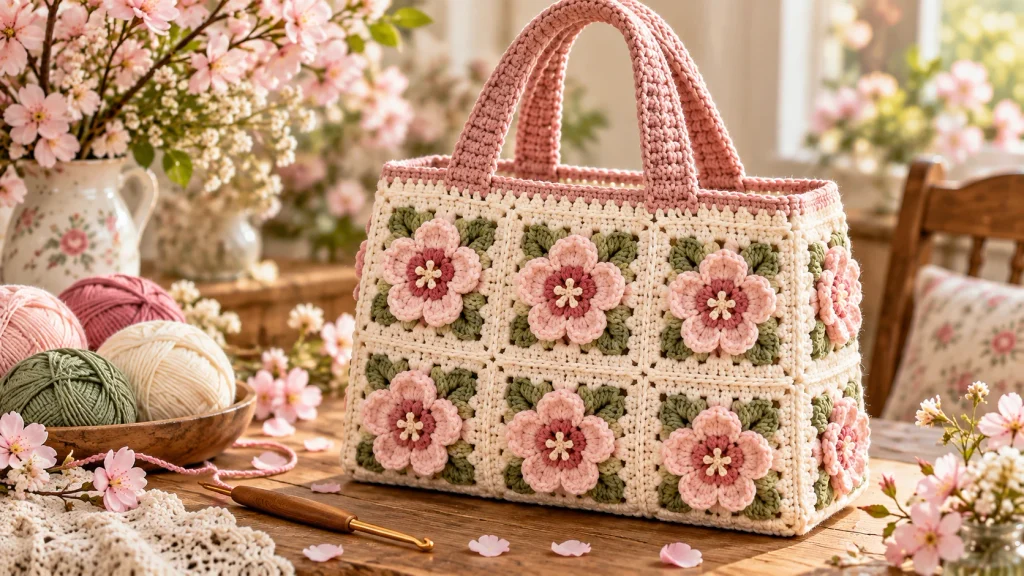
Make the Square Base
Use the same basic granny-square construction from the Vintage Rose design.
Work the first two rounds in green and the remaining rounds in cream.
Make 12 square bases, each measuring approximately 5 inches / 13 cm.
Cherry Blossom Center
Using darker pink yarn, make a magic ring.
Ch 1.
Work 10 sc into the ring.
Pull closed.
Join.
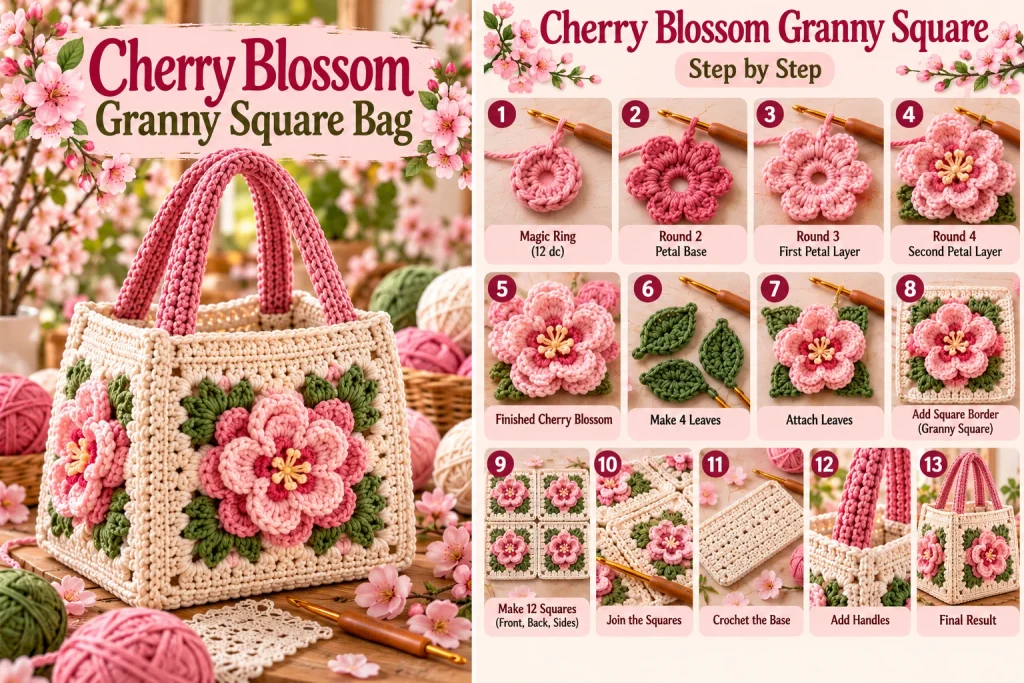
Cherry Blossom Petals
Change to light pink.
The 10 center stitches create five groups of two stitches.
Repeat the following five times:
sl st in next st
Then, in the following stitch:
ch 2, 2 dc, tr, 2 dc, ch 2, sl st
After five repeats you should have five large petals.
Fasten off.
For extra detail, use a short length of cream yarn to embroider several tiny straight stitches or knots in the center of the flower.
Small Cherry Blossom Leaves
Using green yarn:
Ch 5.
Starting in the second chain work:
sl st, sc, hdc
Work 3 sc in the final chain.
Continue down the opposite side with:
hdc, sc, sl st
Fasten off.
Make four small leaves and arrange them behind the flower.
Sew everything securely to the center of the granny square.
Repeat for all twelve squares.
Which Floral Granny Square Bag Should You Make?
| Pattern | Overall Look | Flower Texture | Difficulty | Great For |
|---|---|---|---|---|
| Sunflower | Warm, bold, rustic | Medium | Confident beginner | Summer and autumn |
| Vintage Rose | Romantic, cottagecore | High | Intermediate | Gifts and feminine bags |
| Cherry Blossom | Soft, fresh, spring-inspired | Medium | Confident beginner/intermediate | Spring and pastel projects |
You can also use the construction from one design with the colors of another.
For example, a cream-and-lavender cherry blossom bag can look completely different from the pink version without changing the pattern itself.
How to Assemble the Granny Square Bag
Once your twelve squares are finished and blocked to the same measurement, the three bags use exactly the same construction.
- Arrange four squares in a 2 × 2 layout for the front and another four squares in a 2 × 2 layout for the back. Join each panel using slip stitches, single crochet seams or your preferred invisible joining method. Make two side panels using two squares stacked vertically for each side. You will now have 4 front squares + 4 back squares + 2 left-side squares + 2 right-side squares = 12 squares total.
- Join one side panel to the left edge of the front panel and the second side panel to the right edge. Add the back panel to complete the four walls of the bag.
- For the base, use your border color and chain until the foundation measures approximately the same width as two joined squares, about 26 cm / 10¼ inches. Work sc back and forth until the rectangle measures approximately 13 cm / 5 inches deep. If you are using the recommended gauge, around 40 sc is a reasonable starting point, but matching the finished square measurements is more important than copying an exact chain count.
- Pin or stitch-marker the base to the bottom edges of the bag. Join it evenly around all four sides with sc or slip stitches. Pay particular attention to the corners so that the base stays rectangular instead of twisting.
- Work two rounds of sc around the entire top opening. This reinforces the rim and helps the bag keep its shape.
- For each handle, chain until the strap measures approximately 55–60 cm / 22–24 inches. Work three or four rows of sc. Make a second identical handle. For a thicker strap, fold each piece lengthwise and slip stitch the long edges together.
- Position the handles symmetrically, approximately 7–8 cm / 3 inches from each side seam. Sew each end through several rows of stitches rather than attaching it only to the top edge. Reinforcing this area dramatically improves durability.
- Weave in every yarn tail, gently block the finished bag and allow it to dry completely. Add an optional lining, magnetic snap or removable base insert before using the bag for heavier items.
How to Make Your Crochet Bag More Structured
Granny-square fabric is naturally flexible, but a tote bag usually benefits from some reinforcement.
Start by keeping your tension consistent and avoiding a fabric that is excessively loose.
A smaller hook can create a denser fabric, while a fabric lining reduces stretching and prevents small objects from poking through spaces in the crochet.
You can also cut a removable base insert from plastic canvas and cover it with fabric.
The top edge and handles are the areas that take the most stress, so reinforcing those sections is more important than making the entire bag extremely stiff.
How to Add a Fabric Lining
A lining is optional, but it can make a floral crochet bag feel considerably more finished.
Measure the interior width, height and depth after the crochet bag is completely assembled.
Cut fabric with seam allowance, sew it into a simple box shape and place it inside the bag with the wrong side of the fabric facing the crochet.
Fold the upper raw edge inward and hand-sew the lining to the inside of the crochet top edge.
Keep the stitches small enough that they do not show clearly from the outside.
You can also add a pocket or magnetic snap to the lining before attaching it.
How to Resize the Pattern
The easiest way to resize the bag is by changing the granny square size rather than completely changing the construction.
If you want a smaller bag, stop the border rounds earlier.
For a larger tote, add additional border rounds around every square.
Always make and block one test square before crocheting the remaining eleven.
For example, if each square grows from 13 cm to 15 cm, the front panel becomes approximately 30 cm wide instead of 26 cm without changing the 2 × 2 arrangement.
You can also create a larger bag using more squares—for example, three squares across instead of two—but this changes the amount of yarn, base dimensions and handle placement considerably.
Common Problems and How to Fix Them
| Problem | Likely Cause | Solution |
|---|---|---|
| Squares are different sizes | Different tension | Block to same measurement and check gauge |
| Bag twists after joining | Uneven seams | Match corners first and distribute stitches evenly |
| Flower curls too much | Tight flower tension | Use slightly looser tension |
| Rose feels floppy | Loose assembly stitches | Secure underside firmly |
| Bag stretches downward | Flexible yarn or loose gauge | Add lining/base insert |
| Handles stretch | Too few rows or loose stitches | Make thicker straps and reinforce attachments |
| Squares bulge | Motif too large for base | Add another border round |
| Bag opening feels weak | No top reinforcement | Add 1–2 rounds of sc |
Yarn Substitutions
You do not need the exact same yarn brand to make these bags.
A smooth yarn with clearly visible stitches will make the flowers easier to see.
Cotton or cotton-blend yarn is a strong choice for a structured bag, but acrylic can also work if that is what you have available.
If you substitute yarn weight, make one complete square first.
The important measurement is the finished blocked square, not the name printed on the yarn label.
Color Ideas
The original palettes are only starting points.
A sunflower bag can use burnt orange petals and dark olive leaves for autumn.
The Vintage Rose design can be made in ivory and burgundy for a richer vintage look.
Cherry blossoms can become white flowers with pink centers for a more realistic spring palette, or lavender flowers for a completely different aesthetic.
Using the same border color across every square usually helps a multi-colored bag look cohesive.
How to Care for a Crochet Granny Square Bag
Always check the care instructions for the yarn you actually used.
When in doubt, gentle hand washing is the safest approach for a bag containing dimensional flowers.
Avoid aggressively twisting or wringing the bag because that can distort the squares and petals.
Gently press excess water out with a towel, reshape the bag and allow it to dry flat.
Reshape dimensional flowers with your fingers while the yarn is still slightly damp.
Frequently Asked Questions
How many granny squares do I need for this bag?
This construction uses 12 floral granny squares: four for the front, four for the back and two for each side.
The bottom is crocheted separately as a rectangular base.
What size should each granny square be?
The pattern is designed around squares measuring approximately 5 inches / 13 cm after blocking.
Exact size is flexible as long as every square in your bag is consistent.
Is this granny square bag beginner-friendly?
A beginner who already understands chains, single crochet, double crochet, treble crochet and joining rounds should be able to make the sunflower version with patience.
The dimensional Vintage Rose requires slightly more assembly, so it is better suited to a confident beginner or intermediate crocheter.
If you need to refresh half double crochet before making the motif shaping, see the beginner tutorial here. How to Half Double Crochet
Can I use acrylic yarn?
Yes.
However, different fibers behave differently, so your finished bag may have more or less stretch.
A lining can help if the fabric feels too flexible.
Can I make the bag without a lining?
Absolutely.
A lining is optional.
For an unlined version, use a firm gauge, reinforce the seams and avoid carrying very small items that could slip between stitches.
Which version uses the least complicated flower?
The Cherry Blossom motif is relatively straightforward because each flower has only five main petals.
The sunflower also follows a repetitive structure.
The Vintage Rose requires rolling and sewing a dimensional flower and therefore involves more finishing work.
Can I make only one flower square and use plain squares for the rest?
Yes.
A single floral square surrounded by simpler granny squares can create a more minimal bag and also reduce the amount of time required.
How do I keep crochet bag handles from stretching?
Use firm stitches, make the strap wider, work multiple rows and secure each handle through several rows of the bag rather than only the uppermost stitches.
You can also sew cotton webbing or fabric inside a crochet strap for extra reinforcement.
Final Thoughts
These three floral granny square bag patterns show just how much a single bag construction can change when you switch the flower motif.
Choose the Sunflower Granny Square Bag for a warm, cheerful design.
Make the Vintage Rose Granny Square Bag if you love dimensional flowers and romantic cottage-inspired crochet.
Or choose the Cherry Blossom Granny Square Bag for a softer spring look with delicate five-petal flowers.
Whichever version you choose, focus first on consistent square size and strong joining.
Once your squares are uniform, the assembly becomes much easier—and the same construction can be reused for many future granny square bag designs.
Save your favorite color combination, make one test square, and then turn it into a handmade floral tote of your own.
[…] 3 Free Floral Granny Square Bag Patterns: Sunflower, Rose & Cherry Blossom […]