
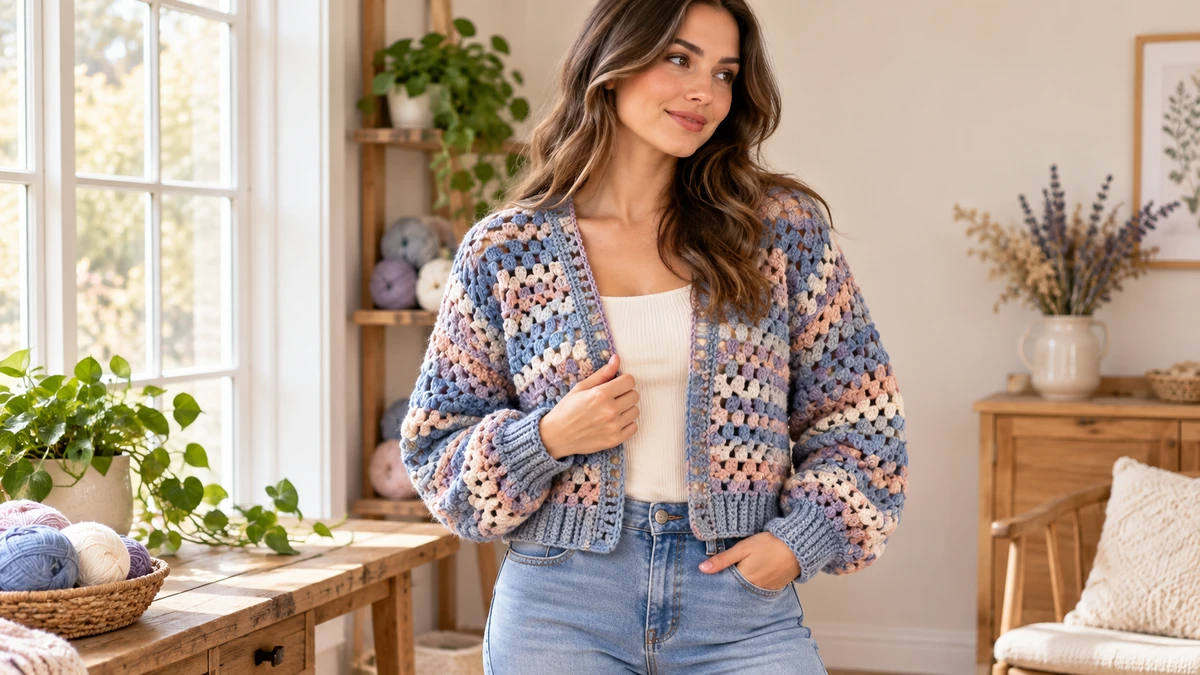
Looking for a beautiful crochet cardigan pattern that combines cozy comfort with a colorful, handmade look?
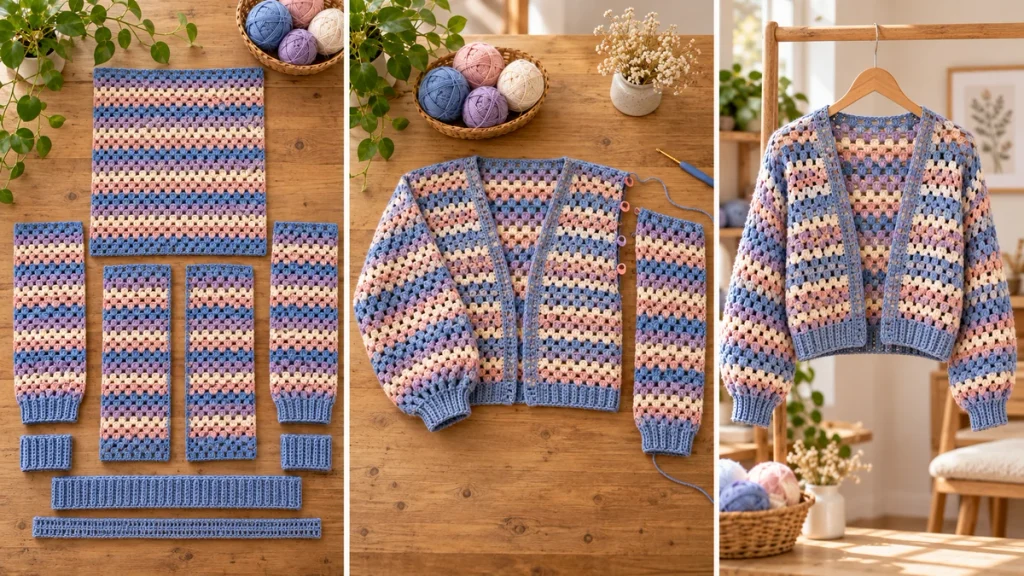
This granny stitch crochet cardigan features an attractive openwork texture, soft multicolored stripes, relaxed sleeves, and a flattering cropped silhouette.
The design uses the classic granny stripe technique, creating groups of double crochet stitches that produce a lightweight, textured fabric.
In this tutorial, you’ll learn how to crochet each section of the cardigan, assemble the pieces, create a soft V-shaped neckline, and add professional-looking ribbed cuffs.
Whether you’re making your first cardigan or looking for a relaxing new crochet project, this guide will help you understand the entire construction process.
Materials and Supplies
Before starting, gather your crochet supplies.
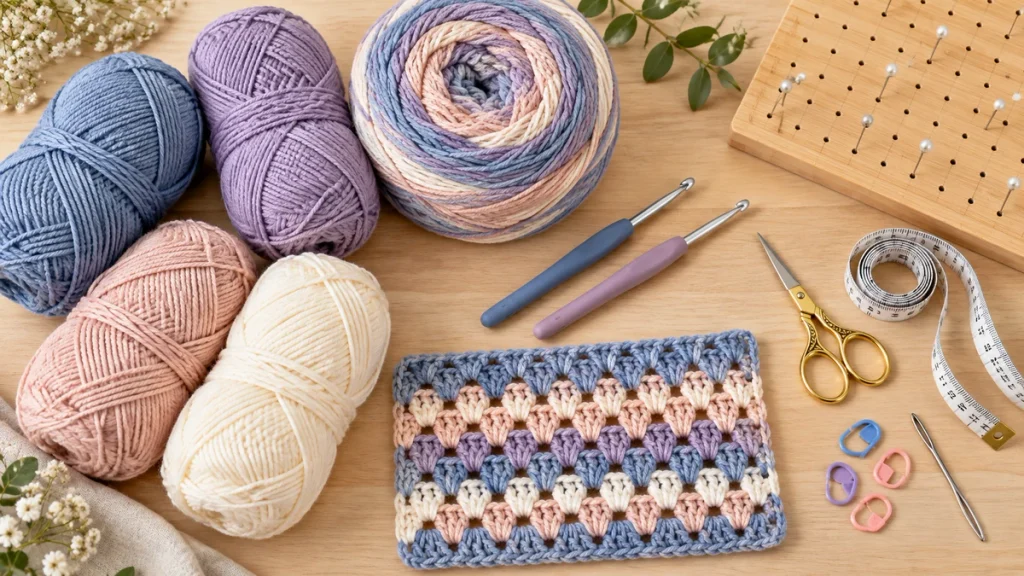
You’ll need:
- Medium-weight (category 4) yarn in your favorite colors.
- A 5–5.5 mm crochet hook, adjusted to obtain the required gauge.
- Scissors and a tapestry needle.
- Stitch markers.
- A measuring tape.
- Blocking supplies appropriate for your yarn.
For a colorful cardigan, try a combination of dusty blue, lavender, cream, and muted pink.
Alternatively, choose a multicolored yarn that changes colors naturally.
The amount of yarn required will depend on your measurements, yarn choice, stitch gauge, and desired cardigan length.
Crochet Abbreviations
This pattern uses standard US crochet terminology.
| Abbreviation | Meaning |
|---|---|
| ch | Chain |
| sc | Single crochet |
| dc | Double crochet |
| sl st | Slip stitch |
| sc2tog | Single crochet two together |
| BLO | Back loop only |
| st | Stitch |
| RS | Right side |
Step 1: Choose Your Cardigan Size
The first step is determining the correct measurements.
For this design, we recommend a relaxed fit with approximately 10–15 cm of positive ease.
Positive ease is the additional space between your actual body measurements and the finished garment measurements. The Craft Yarn Council recommends approximately 10–15 cm for a loose-fitting garment. craftyarncouncil.com
Measure your bust or chest circumference, preferred cardigan length, upper-arm circumference, and desired sleeve length.
Our worked example uses the following measurements:
| Measurement | Example |
|---|---|
| Body bust circumference | 98 cm |
| Intended finished circumference | 110 cm |
| Back panel width | 55 cm |
| Front panel width | 27.5 cm each |
| Main body length | 45 cm |
| Hem ribbing | 4 cm |
| Armhole depth | 22.5 cm |
| Sleeve width | 45 cm |
| Sleeve length before cuff | Approximately 34 cm |
| Cuff length | Approximately 5 cm |
These are example garment measurements, not universal measurements for a particular clothing size.
For the best fit, take your measurements before starting.
Step 2: Make a Crochet Gauge Swatch
Before crocheting the cardigan, make a sample using your chosen yarn and crochet hook.
This helps you determine how many stitches and rows are needed to obtain the correct measurements.
For our example, we’re using the following target gauge:
Approximately four granny stitch groups and eight rows per 10 cm.
These are illustrative target measurements. Your actual gauge must be measured rather than assumed.
Make a sufficiently large swatch using the granny stripe instructions below.
Wash and dry your swatch according to your yarn’s care instructions, then measure the central section without stretching it.
If your swatch is too narrow, consider increasing your hook size. If it’s too wide, try a smaller hook.
A properly prepared gauge swatch is particularly important when making fitted garments. Yarnspirations
Step 3: Learn the Granny Stripe Stitch
The granny stripe stitch is the main stitch used throughout this cardigan.
It consists of groups of three double crochet stitches, commonly called granny groups.
Unlike traditional granny squares, which are generally constructed in rounds, granny stripes are worked in horizontal rows.
For this project, we’re using a variation of the traditional granny stripe technique.
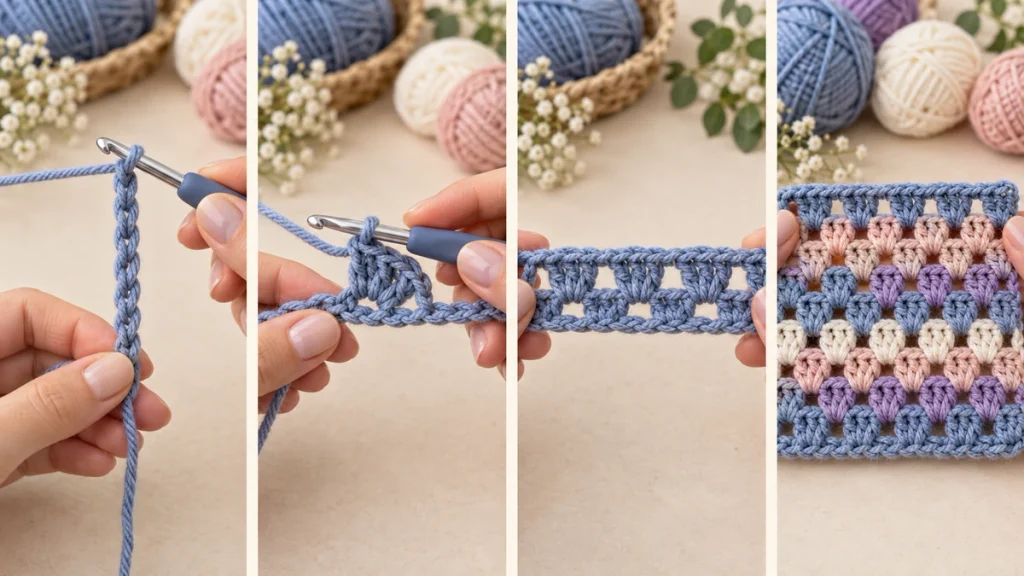
Practice the Stitch
Start by making a foundation chain with a stitch count divisible by three.
For your practice sample, chain 24.
Row 1
Work two double crochet stitches into the third chain from your hook.
The first two chains count as the first double crochet.
Skip the next two chains and work three double crochet stitches into the following chain.
Continue repeating this sequence until you reach the end.
You should have eight complete granny groups.
Row 2
Chain three and turn your work.
The turning chain counts as your first double crochet.
Work three double crochet stitches into each space between the granny groups from the previous row.
Finish with one double crochet in the top of the beginning turning chain from Row 1.
You should have seven granny groups between the two edge stitches.
Row 3
Chain three and turn.
Work two double crochet stitches into the same stitch at the base of your turning chain.
Work three double crochet stitches into each space between the granny groups from the previous row.
Finish by working three double crochet stitches into the final edge stitch.
You should have eight complete granny groups.
Row 4 and Beyond
Repeat Rows 2 and 3, alternating between them to create your granny stripe fabric.
Continue until you’re comfortable maintaining the same width without accidentally adding or missing groups.
Step 4: Crochet the Back Panel
The back panel is the foundation of your cardigan.
For the worked example, we need a finished width of approximately 55 cm.
At the example gauge, this corresponds to 22 granny groups.
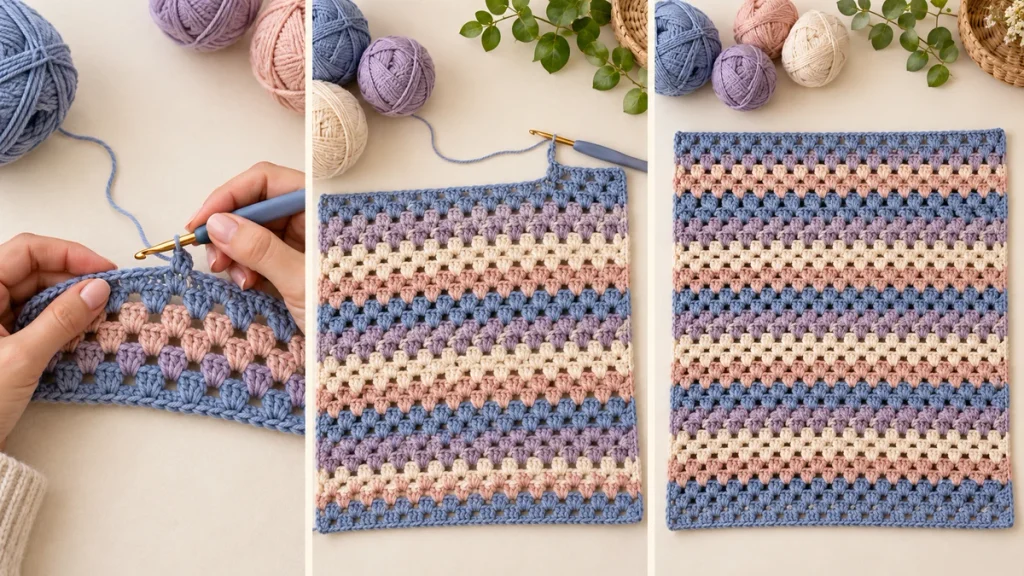
Foundation: Chain 66.
Follow the granny stripe stitch instructions from Step 3.
Your first row should contain 22 complete granny groups.
Continue alternating the two repeating rows until your back panel measures approximately 45 cm.
At the example row gauge, this corresponds to approximately 36 rows in total.
Remember to measure your fabric rather than relying exclusively on the suggested row count.
Fasten off, leaving a sufficiently long yarn tail for sewing.
Your completed back panel should be a rectangle measuring approximately 55 × 45 cm.
Step 5: Crochet the Two Front Panels
Next, crochet two matching front panels.
Each front panel should measure approximately 27.5 cm wide and 45 cm long.
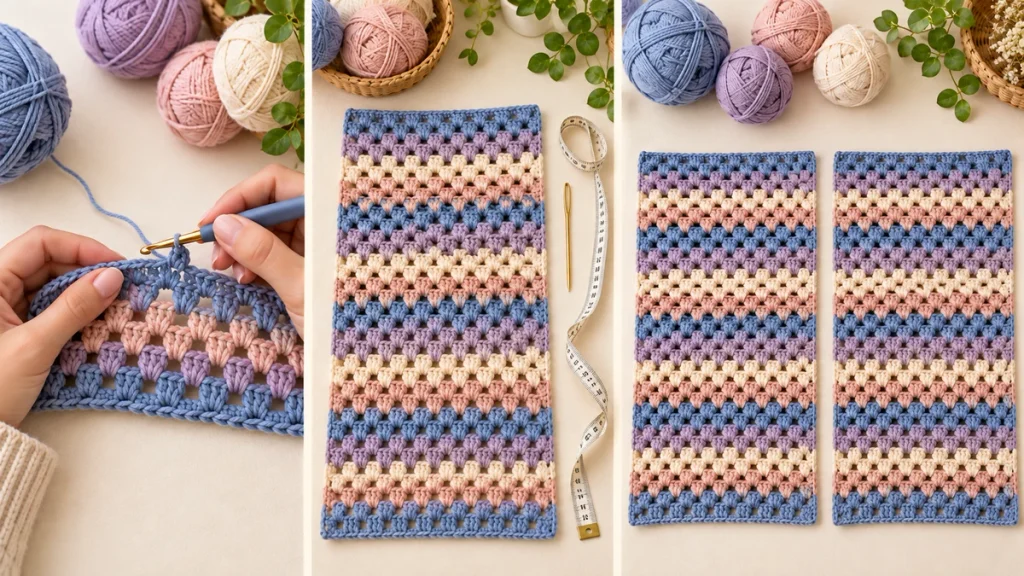
Foundation: Chain 33.
Follow the granny stripe instructions.
Your first row should contain 11 granny groups.
Continue working until your first front panel measures approximately 45 cm.
Repeat the entire process for the second front panel.
At this stage, you’ll have three rectangular pieces: one back panel and two front panels.
Before proceeding, lay all three pieces flat and check that their lengths match.
The two front panels should have identical measurements.
Step 6: Assemble the Shoulders and Create the Neckline
Position the three panels with their right sides facing each other.
Align the outside edges of the front panels with the corresponding outside edges of the back panel.
For the example size, measure approximately 18 cm inward from each outside shoulder edge.
Sew these sections together to create the two shoulder seams.
This leaves approximately 19 cm across the back neckline, with additional unsewn fabric at the upper inner corners of the front panels.
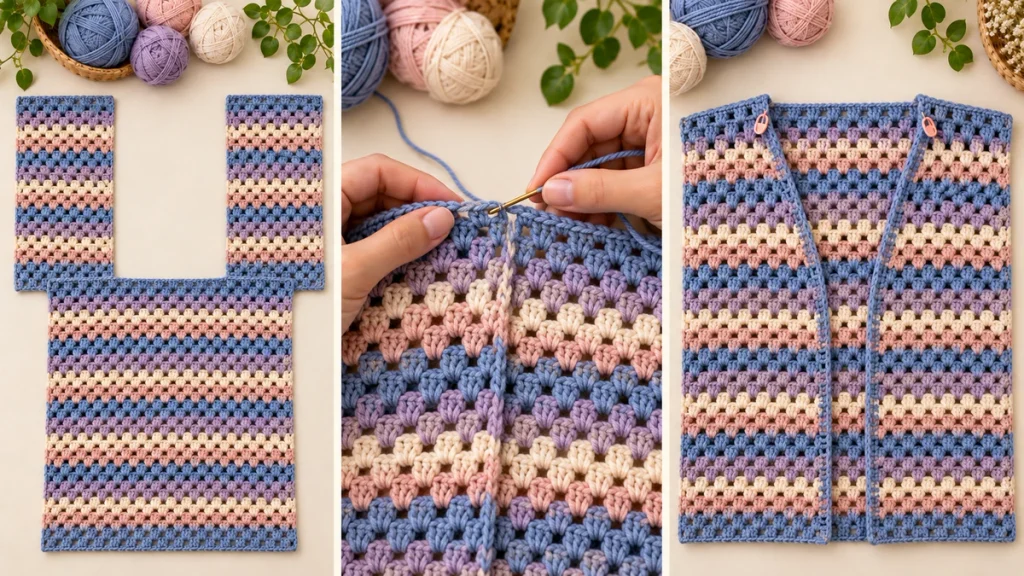
Creating the Soft V-Shaped Neckline
This beginner-friendly variation creates the neckline using folded front corners rather than complicated stitch decreases.
Lay the cardigan flat with the front panels facing upward.
On each front panel, identify the point where the shoulder seam ends.
Measure approximately 12 cm down from the upper inner corner along the cardigan’s front opening.
Fold the upper inner corner toward the wrong side along a diagonal line connecting these two points.
Secure the folded fabric temporarily with pins.
Repeat on the opposite front panel, ensuring that both sides mirror each other.
Try the cardigan on or place it on a suitable dress form to check that the folded edges create the desired neckline.
Once you’re satisfied, secure the folded sections discreetly to the wrong side.
This produces a soft V-style opening.
It is not the same construction as a conventionally shaped V-neck cardigan, but it provides a simpler alternative for this design.
Step 7: Prepare the Armholes
With the shoulder seams completed, measure approximately 22.5 cm downward from each shoulder seam along the outside edges of the cardigan.
Place stitch markers at these points.
These markers identify the bottom of the armholes.
Starting at the bottom hem, sew the front and back panels together along the side seams.
Stop when you reach your armhole markers.
Leave the remaining sections open.
Each armhole should measure approximately 45 cm around its complete opening.
Repeat on the opposite side.
Step 8: Crochet the Sleeves
The sleeves use the same granny stripe stitch as the body.
Our example uses roomy rectangular sleeves that gather into fitted ribbed cuffs.
For each sleeve, create a piece measuring approximately 45 cm wide and 34 cm long before attaching the cuff.
At the example gauge, you’ll need 18 granny groups across the sleeve.
Foundation: Chain 54.
Follow the same granny stripe pattern.
Continue until your sleeve reaches the desired length.
For the worked example, 27 rows should give approximately 34 cm.
Finishing on Row 27 also leaves 18 complete granny groups along the cuff edge, simplifying the cuff instructions below.
Make a second identical sleeve.
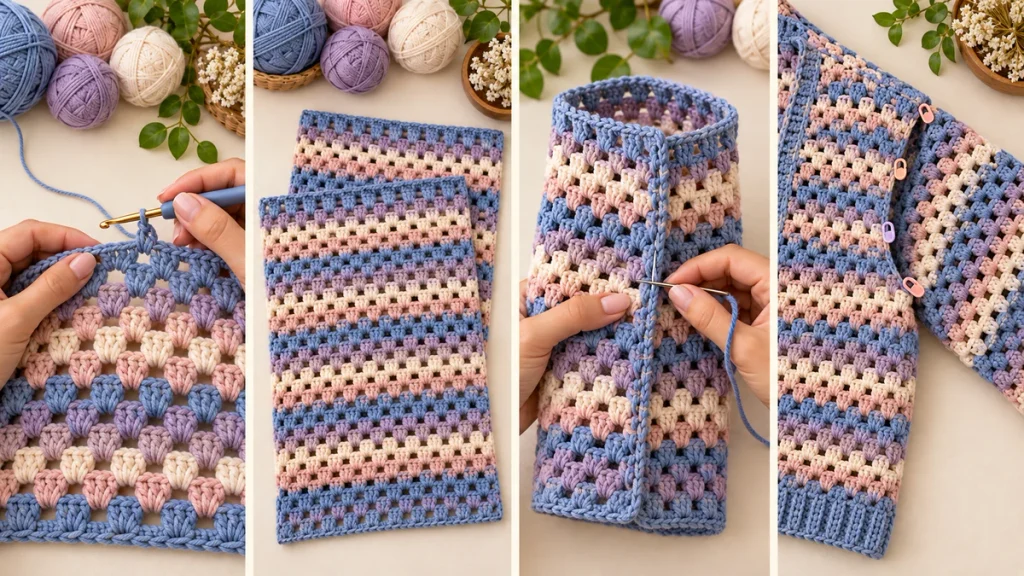
Join the Sleeves
Fold your first sleeve lengthwise, bringing its long edges together.
Sew along the long edge to create a tube.
Repeat for the second sleeve.
Position the top edge of your sleeve inside the cardigan armhole.
Align the sleeve’s upper midpoint with the shoulder seam and its underarm seam with the bottom of the armhole.
Secure the sleeve with stitch markers.
Sew around the opening, distributing the fabric evenly.
Repeat for the second sleeve.
Step 9: Add the Ribbed Cuffs
Ribbed cuffs help create the contrast between the roomy sleeves and the narrower wrists.
For our example, we’ll use single crochet decreases followed by separate back-loop ribbing.
Begin at the wrist opening of your completed sleeve.
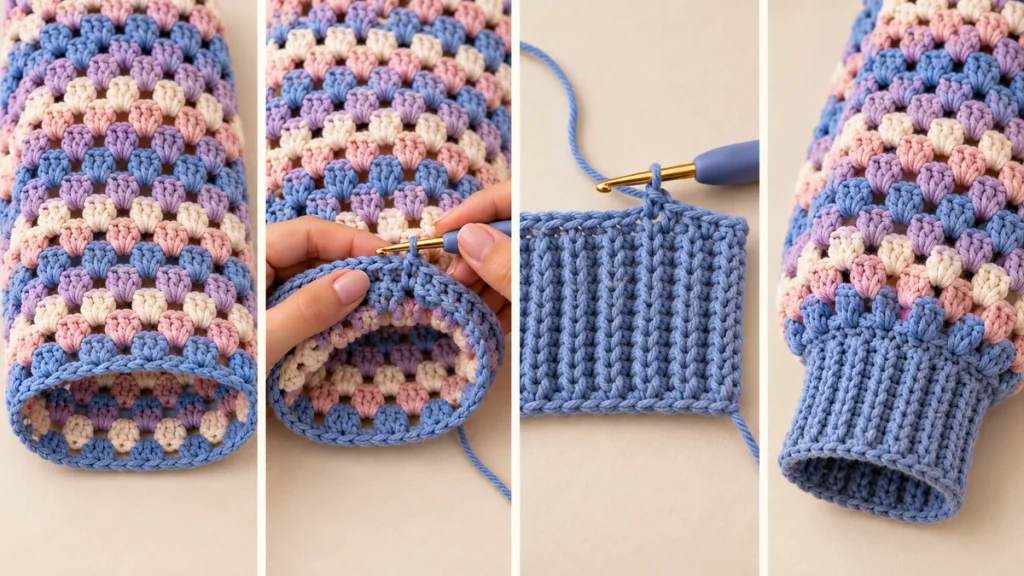
Round 1: Work one single crochet into each stitch around the sleeve opening.
For the example, you should have approximately 54 stitches.
Join with a slip stitch.
Round 2: Repeat one single crochet followed by one single crochet decrease around the opening.
For a starting count of 54 stitches, this produces 36 stitches.
Join and fasten off.
Check that the opening is comfortable and can pass over the wearer’s hand.
Adjust the number of decreases if necessary.
Crochet the Ribbed Band
Make a foundation chain of nine stitches.
Work one single crochet into the second chain from your hook and every remaining chain.
You should have eight single crochet stitches.
Chain one and turn.
Work eight single crochet stitches into the back loops only.
Continue repeating this row until your ribbed strip is long enough to fit comfortably around the wrist.
Join its short ends to form a ring.
Stretch the ring gently and ensure that it can pass over the hand before attaching it.
Pin the ribbed band evenly around the sleeve opening and sew the pieces together.
Repeat for the second sleeve.
Step 10: Add the Bottom Ribbing and Front Edging
To give your cardigan a polished appearance, finish the bottom edge with a matching ribbed band.
Make another back-loop single crochet strip, this time approximately 4 cm deep.
Continue adding rows until the strip matches the complete bottom edge of your assembled cardigan.
Sew the ribbing to the bottom edge, distributing it evenly and avoiding excessive stretching.
For the front opening and neckline, create a narrower ribbed strip, approximately 3 cm deep.
Measure the complete opening after folding and securing the front corners.
This measurement should include the right front edge, both diagonal neckline sections, the back neckline, and the left front edge.
Make a ribbed strip to match this measurement, then pin and sew it around the complete opening.
Check the corners carefully to ensure that the finished neckline lies comfortably.
Step 11: Finish Your Crochet Cardigan
Your cardigan is almost complete.
Weave in all remaining yarn ends securely.
Examine the shoulder seams, sleeve attachments, neckline, and ribbed edges.
Check that both sleeves are the same length and that the front panels hang evenly.
Gently block the cardigan according to your yarn’s care instructions.
Allow the garment to dry completely before wearing it.
Your handmade granny stitch crochet cardigan is now ready!
How to Customize Your Crochet Cardigan
One of the advantages of this construction is that the basic measurements are easy to modify.
For a longer cardigan, increase the number of rows in the back and front panels.
For a wider cardigan, increase the foundation chain counts in multiples of three, maintaining the proportions between the back and front panels.
For the cardigan’s overall circumference, calculate your desired finished measurement by adding your preferred ease to your body measurement.
Divide that measurement by two to determine the approximate back panel width. Each front panel should measure approximately half the width of the back panel.
Use your measured granny stitch gauge to determine the corresponding number of stitch groups.
You can also adjust the depth of the armholes and width of the sleeves.
Remember that changing the armhole measurement also affects the required sleeve width.
For a more colorful cardigan, alternate your favorite yarn colors every few rows.
For a subtler appearance, use a single neutral color with contrasting ribbing.
Frequently Asked Questions
Is this crochet cardigan beginner-friendly?
The rectangular-panel construction is relatively straightforward, making it approachable for crocheters who already know basic stitches.
However, beginners should practice the granny stripe stitch and review the assembly instructions before starting.
What yarn is suitable for a crochet cardigan?
Medium-weight yarn is a practical starting point for this design.
Choose yarn that provides the texture, drape, and comfort you prefer.
Always prepare a gauge swatch before beginning.
Can I make this cardigan longer?
Yes.
Simply increase the length of the back and front panels.
Make sure all three panels have matching lengths before assembly.
How do I avoid uneven stripes?
For consistent stripes, change colors at the beginning of a new row.
If you’re using self-striping or variegated yarn, the color transitions may differ between panels because of their different widths.
This variation can become part of the cardigan’s handmade appearance.
How do I adjust the pattern for a different size?
Start with your body measurements and preferred ease.
Calculate your desired panel widths, then use your personal stitch gauge to determine the number of granny groups required.
Adjust the armhole depth and sleeve measurements to maintain comfortable proportions.