
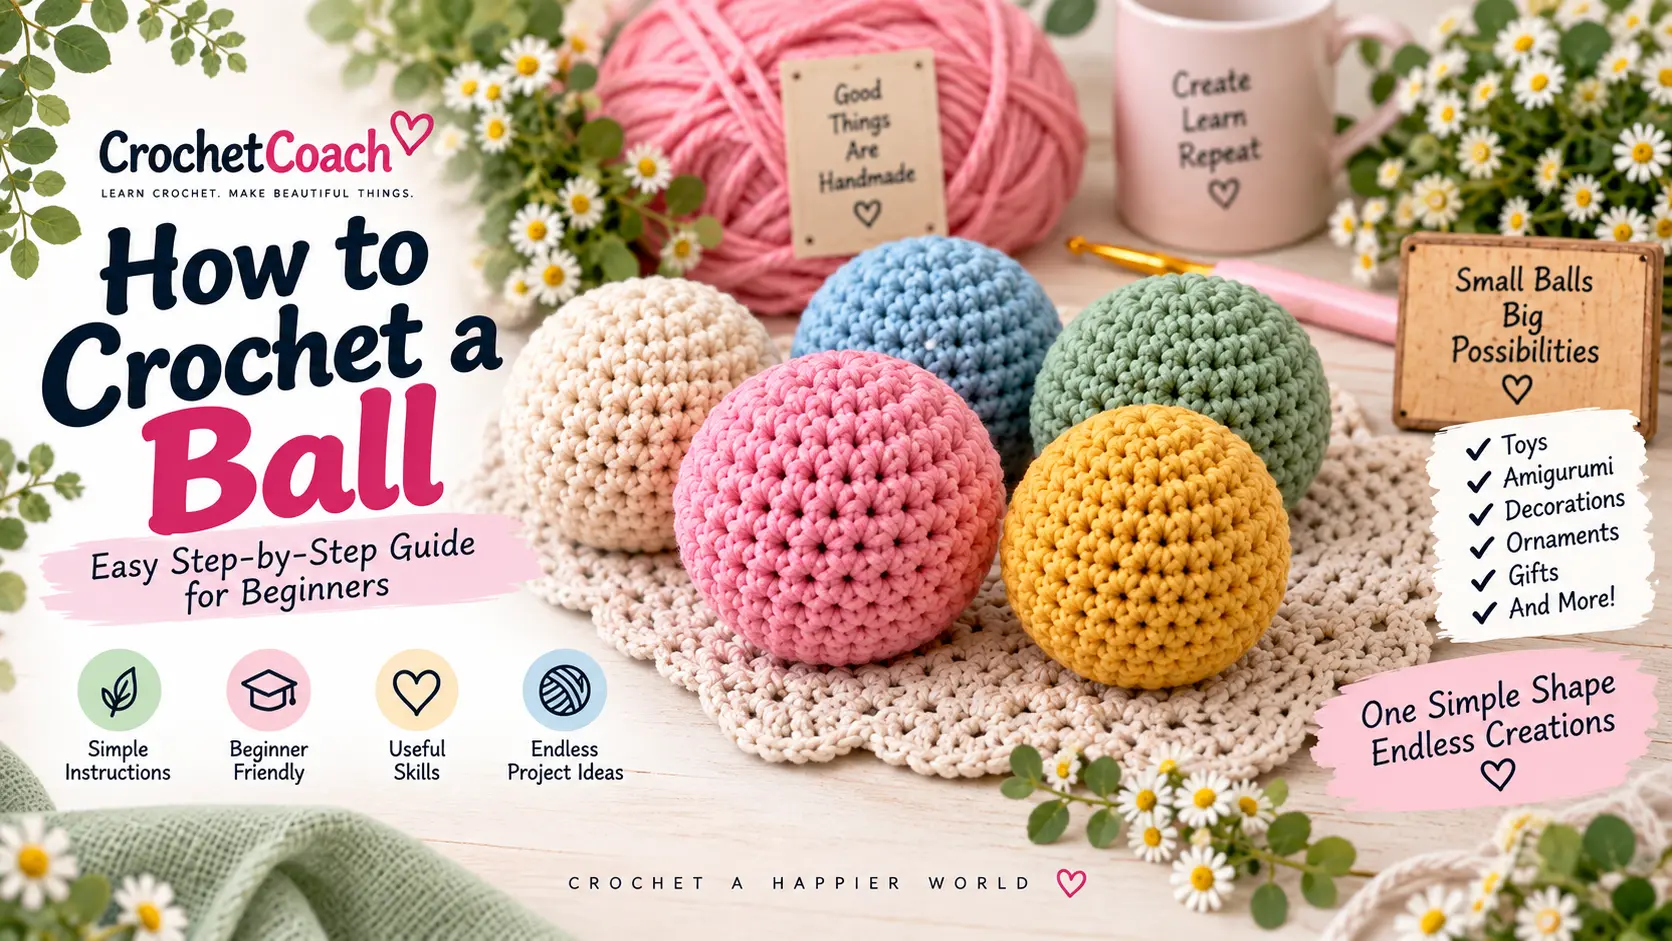
Learning how to crochet a ball is one of the most useful skills for anyone interested in amigurumi. Once you understand the basic construction of a crochet sphere, you can use the same technique to make animal heads, doll bodies, ornaments, toys, decorations, and many other three-dimensional crochet projects.
The basic idea is surprisingly simple:
Increase → Work Even → Decrease → Stuff → Close
In this beginner-friendly tutorial, you’ll learn how to crochet a ball step by step using single crochet. You’ll also learn how to make invisible decreases, adjust the size of your ball, stuff it evenly, and fix common shaping problems.
Crochet Ball Pattern at a Glance
| Detail | Information |
|---|---|
| Skill Level | Beginner |
| Crochet Terms | US |
| Main Stitch | Single Crochet |
| Construction | Continuous spiral |
| Starting Method | Magic Ring |
| Shape | Sphere |
| Stuffing | Polyester fiberfill |
| Main Skills | Increase, single crochet, invisible decrease |
Materials You’ll Need
You only need a few basic supplies:
- Medium-weight yarn
- Crochet hook suitable for your yarn
- Polyester fiberfill
- Stitch marker
- Yarn needle
- Scissors
For amigurumi, a slightly smaller crochet hook than you might normally use with your yarn can help create a dense fabric with fewer visible gaps.
Choose a smooth, light-colored yarn for your first ball. It makes individual stitches much easier to see while you are learning.
Crochet Abbreviations
This pattern uses standard US crochet terminology.
| Abbreviation | Meaning |
|---|---|
| MR | Magic Ring |
| sc | Single Crochet |
| inc | Increase — 2 sc in one stitch |
| inv dec | Invisible Decrease |
| st/sts | Stitch/Stitches |
You can check standard crochet abbreviations through the Craft Yarn Council crochet standards.
Free Crochet Ball Pattern
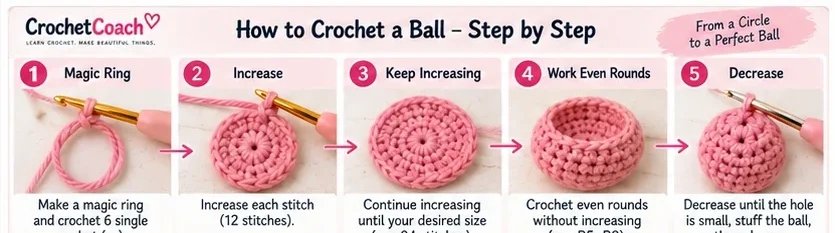
Here is the complete pattern before we break down each round.
Round 1: 6 sc in a magic ring — 6 sts
Round 2: inc × 6 — 12 sts
Round 3: (1 sc, inc) × 6 — 18 sts
Round 4: (2 sc, inc) × 6 — 24 sts
Rounds 5–8: sc around — 24 sts
Round 9: (2 sc, inv dec) × 6 — 18 sts
Round 10: (1 sc, inv dec) × 6 — 12 sts
Stuff the ball firmly but evenly.
Round 11: inv dec × 6 — 6 sts
Fasten off and close the remaining opening.
Now let’s go through every step in detail.
Step 1: Make a Magic Ring
Begin with a magic ring and work:
6 single crochet stitches into the ring.
Pull the yarn tail gently to close the center.
You should have:
6 stitches
A magic ring is especially useful for amigurumi because you can tighten the center opening after making your first stitches.
Place a stitch marker in the first stitch of the round.
Because this ball is worked in a continuous spiral, you will not join each round with a slip stitch. The marker will help you keep track of where each round begins.
Step 2: Increase to 12 Stitches
For Round 2, make an increase in every stitch.
Round 2: inc × 6 — 12 sts
An increase simply means working two single crochet stitches into the same stitch.
After completing the round, you should have 12 stitches.
Move your stitch marker to the first stitch of the new round.
Step 3: Increase to 18 Stitches
Continue expanding the circle.
Round 3: (1 sc, inc) × 6 — 18 sts
This means:
1 single crochet in the first stitch, followed by 2 single crochet stitches in the next stitch.
Repeat that sequence six times.
You should finish with:
18 stitches
Step 4: Increase to 24 Stitches
For the next round:
Round 4: (2 sc, inc) × 6 — 24 sts
Work one single crochet in each of the next two stitches, then make an increase in the following stitch.
Repeat the sequence six times.
You should now have:
24 stitches
This is the maximum stitch count for our beginner crochet ball.
At this stage, your work may still look more like a crochet circle than a ball. That is completely normal.
The three-dimensional shape develops during the next section.
Step 5: Work the Middle of the Ball
Now stop increasing.
For the next four rounds, crochet one single crochet in every stitch.
Rounds 5–8: sc around — 24 sts
Keep the stitch count at 24 for every round.
As you continue crocheting without increases, the sides will begin to rise and the piece will gradually form a rounded bowl shape.
This is one of the most important principles behind crocheting three-dimensional shapes:
Increasing creates width.
Working even creates height.
Decreasing closes the shape.
Once you understand these three stages, many amigurumi patterns become much easier to understand.
Step 6: Begin Decreasing
Now it is time to create the second half of the sphere.
For Round 9:
Round 9: (2 sc, inv dec) × 6 — 18 sts
Work one single crochet in each of the next two stitches, followed by an invisible decrease.
Repeat the sequence six times.
You should finish the round with:
18 stitches
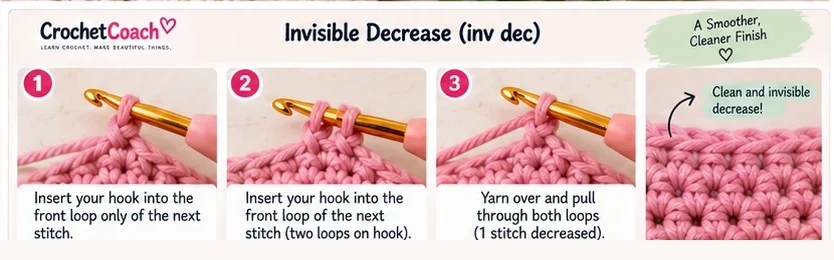
How to Make an Invisible Decrease
Invisible decreases are particularly useful for amigurumi because they create a cleaner-looking surface than many standard decrease methods.
To make an invisible decrease:
- Insert your hook into the front loop only of the next stitch.
- Without completing the stitch, insert your hook into the front loop only of the following stitch.
- Yarn over and pull through both front loops.
- Yarn over again.
- Pull through the remaining loops on your hook.
Two stitches have now become one.
Using invisible decreases can make the closing half of your crochet ball look smoother and reduce noticeable gaps.
Step 7: Decrease to 12 Stitches
Continue shaping the ball.
Round 10: (1 sc, inv dec) × 6 — 12 sts
Work one single crochet followed by one invisible decrease.
Repeat six times.
At the end of the round, you should have:
12 stitches
Your crochet piece should now clearly resemble a ball with a small opening remaining.
Do not close it yet.
This is the best time to add stuffing.
Step 8: Stuff Your Crochet Ball
Take small amounts of polyester fiberfill and gradually place them inside the ball.
Avoid pushing one large piece of stuffing directly into the center.
Instead, add small pieces and distribute them around the inside of the sphere.
Rotate the ball in your hands while stuffing it so you can check its shape from every direction.
The finished ball should feel:
Firm, smooth, rounded, and evenly filled.
Avoid extreme overstuffing.
Too much stuffing can stretch the crochet fabric, distort the sphere, and make white fiberfill visible between stitches.
Understuffing can cause the ball to collapse or develop flat areas.
Before beginning the final round, check whether the shape feels even.
Add a little more stuffing if necessary.
Step 9: Close the Crochet Ball
Now complete the final decrease round.
Round 11: inv dec × 6 — 6 sts
Cut your yarn, leaving a tail long enough for closing the opening.
Pull the yarn through the final loop.
Thread the tail onto a yarn needle.
Pass the needle through the remaining front loops of the final stitches.
Pull gently until the opening closes.
Secure the yarn and hide the remaining tail inside the ball.
Your crochet ball is finished.
The Crochet Ball Formula
Once you understand the basic pattern, you do not have to make every crochet ball the same size.
The basic crochet sphere formula is:
Increase → Work Even → Decrease
For a larger ball, continue adding evenly spaced increase rounds before beginning the middle section.
For example:
6 → 12 → 18 → 24 → 30 → 36
Then work several rounds without increasing.
After that, reverse the shaping:
36 → 30 → 24 → 18 → 12 → 6
Stuff before the opening becomes too small and then close the remaining stitches.
This basic construction can be adapted to many different yarn weights and project sizes.
However, treat it as a starting formula rather than an absolute mathematical rule. Yarn thickness, hook size, stitch height, tension, stuffing, and the number of straight rounds can all affect the final shape.
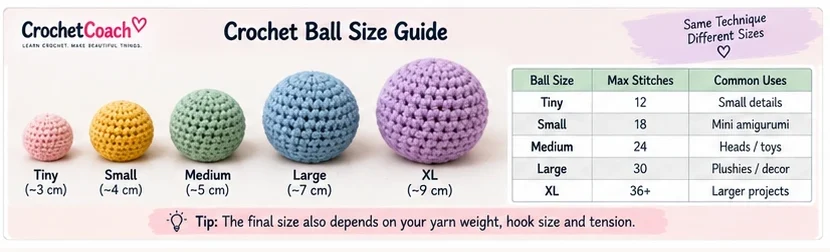
Crochet Ball Size Guide
Here is a simple way to plan different ball sizes.
| Ball Size | Approx. Maximum Stitch Count | Possible Uses |
|---|---|---|
| Tiny | 12 | Small details and miniatures |
| Small | 18 | Mini amigurumi |
| Medium | 24 | Toy heads and small animals |
| Large | 30 | Larger amigurumi and decorations |
| XL | 36+ | Plushies and larger projects |
These are stitch-count guidelines, not guaranteed physical measurements.
A ball made with thick plush yarn and 24 stitches will be much larger than a 24-stitch ball made with thin cotton yarn.
Your final diameter depends heavily on yarn weight, hook size, and gauge.
How to Make a Crochet Ball Bigger
To make a larger ball, continue increasing before beginning your even rounds.
For example:
R1: 6 sc — 6
R2: inc × 6 — 12
R3: (1 sc, inc) × 6 — 18
R4: (2 sc, inc) × 6 — 24
R5: (3 sc, inc) × 6 — 30
R6: (4 sc, inc) × 6 — 36
You can then work even rounds before beginning your decreases.
The more increase rounds you add, the larger the circumference becomes.
How to Make a Crochet Ball Smaller
For a smaller ball, stop increasing earlier.
A mini ball could use:
6 → 12 → 18
Then work a few even rounds before decreasing:
18 → 12 → 6
Using thinner yarn and a smaller hook will reduce the physical size even further.
How to Make Your Crochet Ball Look Rounder
Sometimes a crochet ball develops slightly visible corners instead of looking perfectly smooth.
This can happen because increases are repeatedly positioned above increases from previous rounds.
One useful technique is to stagger your increases.
Instead of placing every increase directly above the previous increase, shift their positions while maintaining the same total number of stitches for that round.
The same idea can be used when decreasing.
Remember:
The stitch count controls the overall shaping.
The placement of increases and decreases can influence how visually smooth the shape appears.
Do not randomly add or remove stitches while staggering. The total stitch count for the round still needs to remain correct.
Continuous Spiral vs. Joined Rounds
Amigurumi balls are commonly crocheted in a continuous spiral.
Instead of joining the end of each round with a slip stitch, you simply continue crocheting into the first stitch of the next round.
Advantages of a continuous spiral
- Fewer visible seams
- Smooth amigurumi appearance
- Simple construction
- No joining at the end of every round
The main disadvantage is that it becomes easy to lose track of the beginning of the round.
That is why a stitch marker is extremely useful.
Move the marker to the first stitch every time you begin a new round.
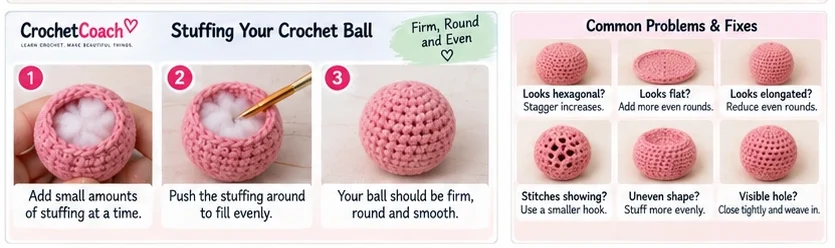
Common Crochet Ball Problems and How to Fix Them
My Crochet Ball Looks Hexagonal
Your increases may be stacking in the same positions.
Try staggering the placement of increases while keeping the correct total stitch count.
My Ball Looks Flat
You may need additional even rounds in the middle section.
The increase rounds create width, but the even rounds help create the height needed for a sphere.
My Ball Looks Too Long
You may have crocheted too many even rounds.
Reduce the number of middle rounds on your next ball.
Stuffing Is Showing Through the Stitches
Your crochet fabric may be too loose.
Try:
- Using a slightly smaller hook
- Improving tension consistency
- Avoiding excessive stuffing
A dense crochet fabric is usually preferable for stuffed amigurumi.
My Ball Is Lumpy
Uneven stuffing is often the cause.
Remove some fiberfill if necessary and add it again in smaller pieces.
Spread the stuffing around the inside instead of concentrating it in one area.
I Can See Holes Around My Decreases
Try using an invisible decrease rather than a standard single crochet decrease.
Also check that your tension is not becoming loose while decreasing.
The Final Opening Won’t Close Neatly
Leave a long yarn tail and use a yarn needle to pass through the remaining front loops.
Pull them together gradually rather than trying to force the opening closed all at once.
What Can You Make With a Crochet Ball?
A simple sphere can become the foundation for dozens of crochet projects.
You can use crochet balls to create:
- Amigurumi animal heads
- Doll heads
- Teddy bears
- Bunnies
- Frogs
- Snowmen
- Christmas ornaments
- Pumpkins
- Decorative balls
- Plush toys
- Baby mobiles
- Keychains
Once you understand sphere construction, you can start modifying the proportions to create more advanced three-dimensional shapes.
For example, adding more even rounds can create a longer body, while changing where you increase or decrease can create oval and pear-shaped forms.
Tips for a Better Crochet Ball
Count Every Round
One missed increase or decrease can change the symmetry of your ball.
Check your stitch count at the end of every shaping round.
Always Use a Stitch Marker
When working in continuous rounds, mark the beginning of every round.
Keep Your Tension Consistent
Sudden changes in tension can create visible differences in the surface.
Stuff Gradually
Small pieces of stuffing are easier to distribute than one large piece.
Check the Shape Before Closing
Once the final opening is closed, adjusting the stuffing becomes much harder.
Rotate the ball and inspect it from several angles first.
Practice With Regular Yarn
If you are a complete beginner, smooth medium-weight yarn is often easier to work with than fluffy or chenille yarn because you can see individual stitches clearly.
Frequently Asked Questions
Is a crochet ball difficult for beginners?
No. A simple crochet ball uses several fundamental amigurumi techniques: a magic ring, single crochet, increases, even rounds, decreases, stuffing, and closing.
It is an excellent practice project before attempting more complicated amigurumi.
What stitch should I use to crochet a ball?
Single crochet is commonly used for amigurumi balls because it produces a relatively dense fabric and makes gradual shaping straightforward.
How many stitches do I need for a crochet ball?
There is no single stitch count for every ball.
A small beginner sphere might reach 18 stitches at its widest point, while a medium ball could reach 24 or 30 stitches. Larger projects can continue increasing beyond that.
How do I make a crochet ball bigger?
Add more increase rounds before working the middle section. You can also use thicker yarn or a larger hook, although your fabric should remain dense enough to contain the stuffing.
Why is my crochet ball not perfectly round?
Check your stitch counts, the number of even rounds, increase and decrease placement, tension, and stuffing distribution. Staggering increases and decreases may also help create a smoother-looking surface.
When should I stuff a crochet ball?
Begin stuffing after you have completed several decrease rounds but while the opening is still large enough to distribute the fiberfill evenly.
What is an invisible decrease?
An invisible decrease reduces two stitches to one by working through the front loops of two adjacent stitches. It is especially useful in amigurumi because the decrease can be less noticeable on the finished fabric.
Can I crochet a ball without a magic ring?
Yes. If you do not want to use a magic ring, you can use an alternative closed starting method. However, a magic ring is convenient because its center can be tightened after the first round.
Why are there gaps between my stitches?
Your hook may be too large for the yarn, your tension may be loose, or the ball may be overstuffed. A slightly smaller hook and more consistent tension can help create denser amigurumi fabric.
Final Thoughts
Learning how to crochet a ball gives you one of the most useful building blocks in amigurumi.
The entire construction can be remembered with five simple stages:
Increase → Work Even → Decrease → Stuff → Close
Start with the beginner pattern in this tutorial and focus on maintaining accurate stitch counts and consistent tension.
Once you are comfortable with the basic sphere, experiment with more increase rounds, different yarn weights, and different numbers of middle rounds.
That simple crochet ball can eventually become the head of a bunny, the body of an animal, an ornament, a plush toy, or the foundation for your own original amigurumi design.