
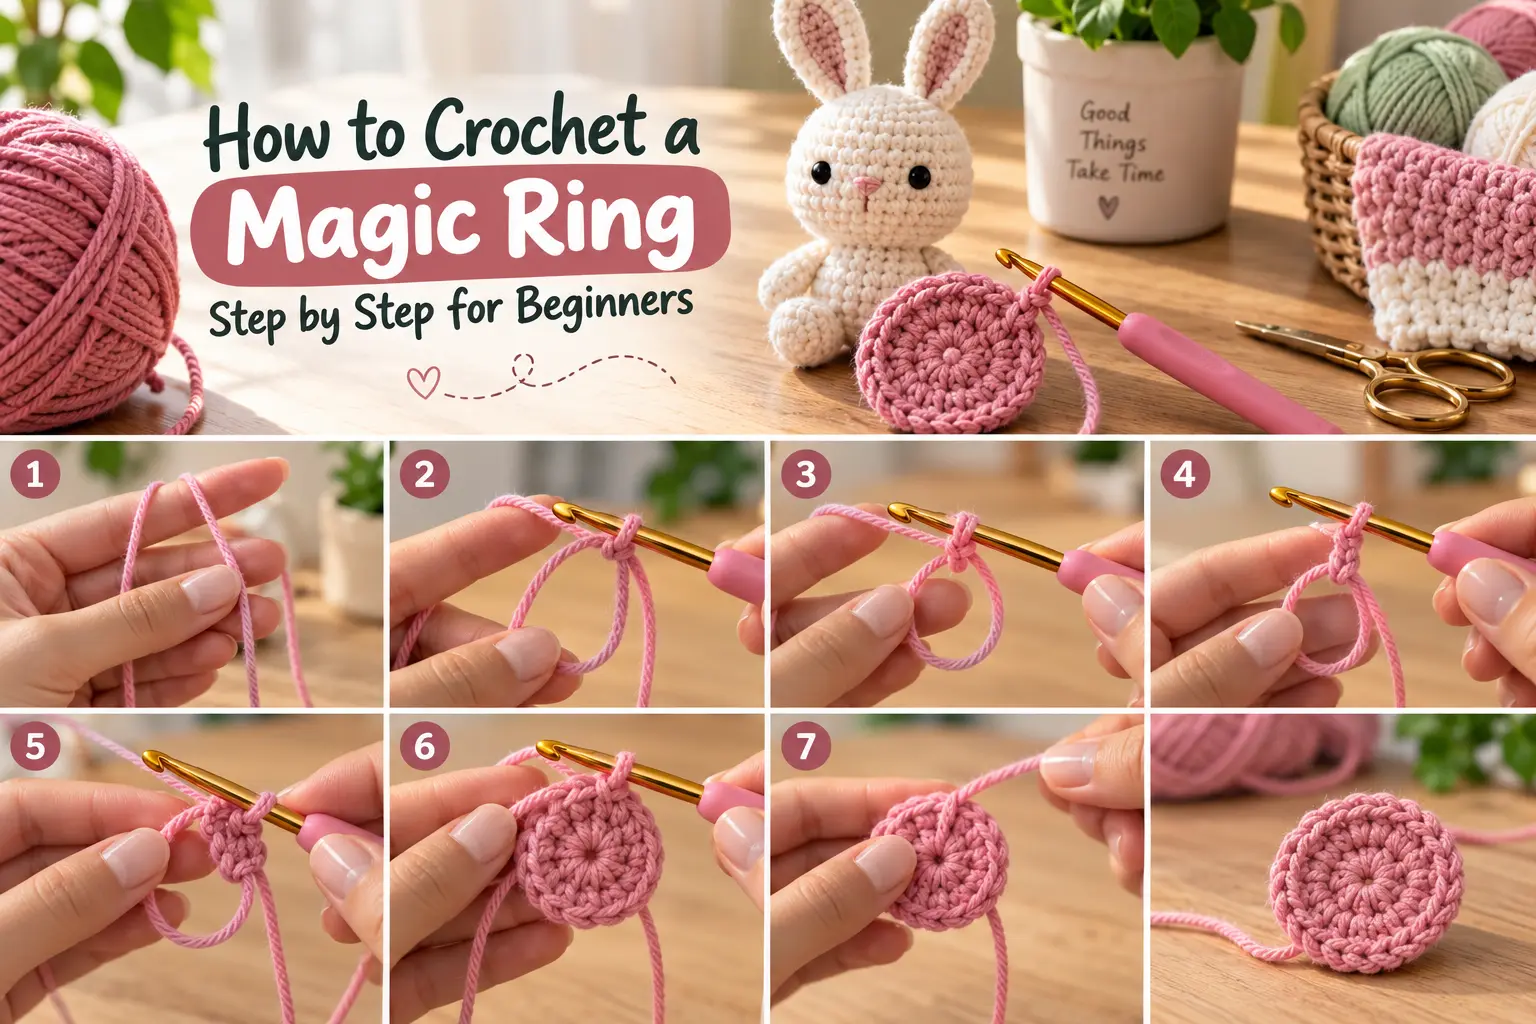
The magic ring, also called a magic circle or adjustable ring, is one of the most useful techniques to learn when crocheting in the round. It creates an adjustable center that can be pulled tightly closed, making it especially useful for amigurumi, hats, coasters, circles, flowers, and granny-style projects.
If the magic ring feels confusing at first, that is completely normal. The technique involves holding the yarn, forming a loop, inserting the hook, and securing the first stitches at the same time. Once you understand the sequence, it becomes much easier.
In this beginner tutorial, you’ll learn how to crochet a magic ring step by step, how to tighten it correctly, how to keep it from coming loose, and what to do when your pattern starts with instructions such as “6 sc in MR.”
Magic Ring Quick Guide
| Detail | Information |
|---|---|
| Skill Level | Beginner |
| Also Called | Magic Circle, Adjustable Ring |
| Common Abbreviation | MR |
| Best For | Crochet projects worked in the round |
| Common First Round | 6 sc in MR |
| Main Advantage | Adjustable center hole |
| Crochet Terms | US |
What Is a Magic Ring in Crochet?
A magic ring is an adjustable loop used to begin crochet projects that are worked from the center outward.
Instead of making several chains and joining them into a fixed ring, you create an adjustable yarn loop and crochet your first-round stitches directly into it.
After the stitches are complete, you pull the yarn tail.
The center contracts and can close almost completely.
This is particularly useful when you want a neat center without a noticeable opening.
What Is a Magic Ring Used For?
You’ll see the magic ring in many crochet patterns, especially:
- Amigurumi
- Crochet animals
- Crochet balls
- Granny squares
- Crochet circles
- Hats worked from the crown
- Flowers
- Coasters
- Round baskets
- Motifs
If you plan to make amigurumi, learning the magic ring is particularly valuable because many patterns begin with it.
Materials You’ll Need
You don’t need special equipment.
For practice, use:
- Medium #4 yarn
- 5–5.5 mm crochet hook
- Scissors
- Stitch marker, optional
A smooth, light-colored yarn is easier for beginners because you can see the individual strands and stitches more clearly.
Avoid very fuzzy yarn while first learning the technique.
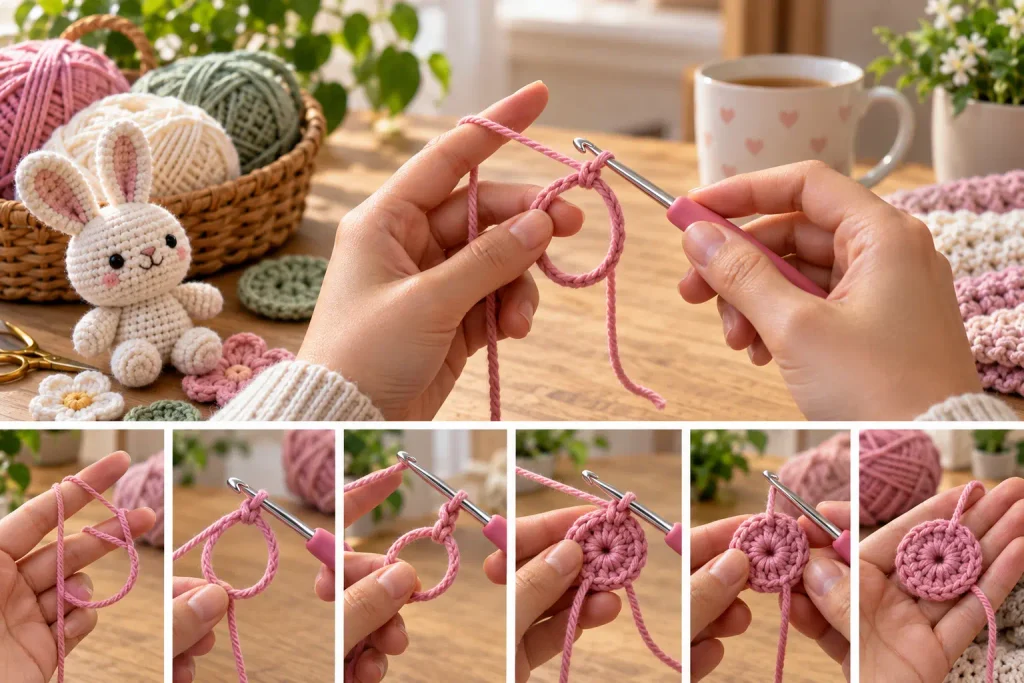
How to Crochet a Magic Ring Step by Step
For this tutorial, we’ll make the classic beginning used in many amigurumi patterns:
6 single crochet stitches into a magic ring.
Step 1: Leave a Yarn Tail
Start by leaving approximately:
6 inches / 15 cm of yarn
before creating your loop.
Don’t make the tail extremely short.
A reasonable tail gives you something substantial to pull when closing the ring and enough yarn to weave in securely later.
Step 2: Create a Loop
Lay the yarn across your fingers.
Wrap the yarn around your fingers to create a loop.
The working yarn should continue toward the yarn ball while the shorter end remains the tail.
Make sure you can clearly distinguish between:
Working yarn = connected to the yarn ball
Yarn tail = loose end
This distinction becomes important when tightening the ring.
Step 3: Insert Your Crochet Hook
Insert your crochet hook underneath the yarn loop.
Catch the working yarn with the hook.
Pull it through the loop.
You should now have a loop on your crochet hook.
Don’t pull the original ring closed yet.
You still need space to work your first stitches into it.
Step 4: Secure the Ring
Yarn over and pull through the loop on your hook to make a securing chain.
This stabilizes the adjustable loop so you can begin crocheting into it.
The large adjustable ring should remain open underneath your hook.
Step 5: Crochet Into the Ring
Now work your stitches directly around the ring.
For our practice example:
Work 6 single crochet stitches into the magic ring.
When inserting your hook, make sure you’re working around both the ring and the yarn tail so the tail becomes trapped beneath the stitches.
After completing the round, count:
1 – 2 – 3 – 4 – 5 – 6
You should have six single crochet stitches.
Step 6: Pull the Yarn Tail
Hold your stitches gently.
Find the yarn tail.
Slowly pull it.
As you pull, the center of the magic ring should become smaller.
Continue until the center is snug.
Avoid violently pulling the yarn. A controlled pull reduces unnecessary stress on the fiber.
You have now created a crochet magic ring.
The 10-Second Magic Ring Formula
Once you understand the technique, remember this sequence:
Loop → Insert hook → Pull up working yarn → Secure → Crochet into ring → Pull tail
That is the basic magic ring process.
What Does “6 SC in MR” Mean?
This is extremely common in amigurumi patterns.
If you see:
R1: 6 sc in MR (6)
it means:
- Make a magic ring.
- Crochet 6 single crochet stitches into it.
- Pull the tail to close the center.
- You now have 6 stitches.
The (6) at the end indicates the stitch count after completing the round.
The starting securing chain is generally not counted as one of those six single crochet stitches unless a specific pattern explicitly tells you otherwise.
How to Find the First Stitch
After tightening the ring, beginners sometimes struggle to identify where the next round begins.
Before pulling the center completely closed, place a stitch marker into the first single crochet you made.
After completing six stitches, you’ll know exactly where Round 2 begins.
This is especially helpful when crocheting amigurumi in a continuous spiral.
Magic Ring for Amigurumi
The magic ring is commonly used in amigurumi because it allows you to tighten the center of a crocheted sphere or body part.
A typical amigurumi beginning looks like:
Round 1: 6 sc in MR (6)
Round 2: inc × 6 (12)
Round 3: (1 sc, inc) × 6 (18)
Round 4: (2 sc, inc) × 6 (24)
The magic ring creates the center.
The following rounds use increases to expand the circle.
This same basic structure appears in many crochet animals, dolls, balls, and other three-dimensional projects.
How to Tighten a Magic Ring Correctly
A magic ring should close smoothly when you pull the tail.
Hold the crocheted stitches with one hand.
Use the other hand to pull the tail steadily.
You should see the center opening shrink.
Stop once the center is neatly closed.
You don’t need to pull with excessive force.
After completing more of the project, securely weave the tail through the back of the stitches in multiple directions according to the needs of the project.
This is important because the magic ring remains adjustable until the tail is secured.
Why Won’t My Magic Ring Close?
Several problems can prevent the ring from tightening.
1. You’re Pulling the Wrong Yarn
Make sure you’re pulling the tail, not the working yarn connected to the ball.
2. The Yarn Is Tangled
The adjustable strand needs to move freely.
Check that the loop hasn’t become twisted or knotted.
3. You Crocheted Into the Wrong Place
Your stitches should be worked around the adjustable loop.
If the yarn tail isn’t positioned correctly beneath the stitches, the construction may not tighten as expected.
4. Your Stitches Are Extremely Tight
Very tight stitches can make the adjustable strand difficult to move.
Try maintaining comfortable tension.
5. The Yarn Has High Friction
Some textured or fuzzy yarns don’t slide easily.
Practice first with smooth yarn.
Why Does My Magic Ring Come Loose?
A magic ring is designed to move.
That’s what allows you to tighten it.
But this also means the yarn tail must eventually be secured properly.
After completing enough of the project, weave the tail securely through the back of several stitches rather than simply cutting it short.
For items that will be handled or washed frequently, careful finishing is particularly important.
Common Magic Ring Mistakes
Making the Tail Too Short
A tiny tail is difficult to hold, tighten, and weave in.
Leave several inches.
Pulling the Ring Closed Too Early
Keep the ring open until all first-round stitches are complete.
Forgetting to Crochet Over the Tail
Position the tail so your first-round stitches are worked around it along with the ring.
Losing the First Stitch
Use a stitch marker.
Counting the Securing Chain as a Stitch
In a basic single-crochet magic ring, the securing chain generally isn’t one of your six single crochets unless your specific pattern states otherwise.
Pulling Too Hard
You want a closed center, not damaged yarn.
Tighten firmly but carefully.
Magic Ring vs. Chain Ring
There are two common ways to begin a crochet circle.
Magic Ring
You create an adjustable loop and crochet into it.
Advantage: The center can be tightened.
Chain Ring
You make several chains, join them with a slip stitch, and crochet into the resulting center.
Advantage: Some beginners find the construction easier to understand.
The biggest visual difference is usually the center opening.
A chain ring has a fixed center.
A magic ring is adjustable.
Can You Crochet in the Round Without a Magic Ring?
Yes.
The magic ring is useful, but it isn’t mandatory for every circular project.
One common alternative is:
Ch 4 → Sl st into first chain → Crochet into the center
Another approach for some single-crochet projects is to work into an early chain according to the specific pattern.
These alternatives can be easier when working with yarn that is difficult to slide.
However, they may leave a more noticeable center opening.
Single Crochet Magic Ring
The most common beginner version is:
6 sc in MR
This is frequently used for amigurumi and small crochet spheres.
After completing six stitches, pull the tail to close the center.
You can then begin increasing in the next round.
Half Double Crochet Magic Ring
The same technique can be used with half double crochet.
Make the magic ring, secure it, and then work the required number of HDC stitches into the center.
The number of starting stitches depends on the pattern and the shape you’re trying to create.
Double Crochet Magic Ring
You can also work double crochet stitches into a magic ring.
This is common in:
- Granny-style motifs
- Flowers
- Crochet circles
- Decorative motifs
Follow the pattern’s instructions for the required number of chains and double crochet stitches because turning/starting chains and stitch counts can vary by design.
Magic Ring vs. Slip Knot
These are different techniques.
A slip knot creates the adjustable loop placed directly on your crochet hook when beginning many crochet projects.
A magic ring creates a larger adjustable center into which multiple stitches are worked.
You may use a slip-knot-like motion while creating some versions of the magic ring, but the finished functions are different.
Magic Ring vs. Slip Stitch
These are also different.
A magic ring is a starting method.
A slip stitch is a crochet stitch commonly used to:
- Join rounds
- Move across stitches
- Finish edges
- Create seams
- Close chain rings
Don’t confuse the abbreviation MR with sl st.
Continuous Rounds vs. Joined Rounds
After making your magic ring, your project may continue in one of two ways.
Continuous Spiral
You continue directly into the first stitch without joining each round.
This method is extremely common in amigurumi.
Use a stitch marker to track the beginning of each round.
Joined Rounds
You finish each round with a slip stitch and begin the next round according to the pattern.
This construction is common in many circles, motifs, hats, and decorative projects.
Always follow the instructions of the specific pattern you’re using.
How to Practice the Magic Ring
Don’t start with expensive yarn or a complicated project.
Practice this sequence several times:
- Create the loop.
- Insert the hook.
- Pull up the working yarn.
- Secure the loop.
- Make 6 single crochet stitches.
- Count them.
- Pull the tail.
- Open it again if possible.
- Repeat.
After several repetitions, your hands begin to remember the movements.
Best Yarn for Learning the Magic Ring
For your first attempts, choose:
- Medium-weight yarn
- Smooth texture
- Light or medium color
- Good stitch definition
Avoid:
- Black yarn
- Very fuzzy yarn
- Eyelash yarn
- Extremely thin yarn
- Very slippery novelty yarn
These aren’t necessarily bad yarns. They’re simply harder to see and control while learning a new technique.
Magic Ring Troubleshooting Chart
| Problem | Possible Cause | What to Try |
|---|---|---|
| Ring won’t close | Wrong strand being pulled | Pull the yarn tail |
| Ring closes poorly | Yarn tangled | Re-form the loop |
| Stitches difficult to make | Tension too tight | Relax your grip |
| Can’t find first stitch | No marker | Mark first stitch |
| Center opens later | Tail not secured | Weave tail securely |
| Wrong stitch count | Extra/missed stitch | Count before Round 2 |
| Yarn won’t slide | High-friction yarn | Practice with smoother yarn |
What Should You Crochet After Learning the Magic Ring?
Once you understand the magic ring, you can use it throughout CrochetCoach projects.
Try:
Crochet Circle
Learn how increases turn the magic ring into a flat circle.
Crochet Ball
Use increases, straight rounds, and decreases to turn the center into a three-dimensional sphere.
Bunny Amigurumi
Many amigurumi body parts begin from an adjustable center.
Frog Amigurumi
Practice creating rounded crochet shapes.
Mushroom Amigurumi
Use the technique to start small circular components.
Axolotl Amigurumi
Practice repeated amigurumi construction while improving your stitch control.
This is why learning the magic ring early can make many future patterns easier.
Frequently Asked Questions
Is a magic ring difficult for beginners?
It can feel awkward at first because you need to control several yarn strands simultaneously. Practicing with smooth, medium-weight yarn usually makes the technique easier to understand.
Is a magic ring the same as a magic circle?
Yes. Magic ring, magic circle, and adjustable ring are commonly used names for the same general starting technique.
What does MR mean in crochet?
MR commonly stands for magic ring.
How many stitches go into a magic ring?
It depends on the pattern. Six single crochet stitches are common for amigurumi, but other projects may use different stitch types and starting counts.
Does the magic ring count as a stitch?
No. The ring itself is a starting structure, not a crochet stitch. Count the actual stitches worked into the ring according to your pattern.
Why is there still a hole in the center?
Pull the yarn tail carefully after completing the first-round stitches. If the center still won’t close, check whether the adjustable strand is trapped or tangled.
Do I need a magic ring for amigurumi?
Not always, but it is extremely useful because it creates an adjustable center. Some patterns provide chain-based alternatives.
Should I cut the magic-ring tail after closing it?
Don’t cut it immediately next to the work. Leave enough tail to weave in securely so the adjustable center is less likely to loosen later.
Can I use a magic ring with double crochet?
Yes. Magic rings can be used with single crochet, half double crochet, double crochet, and other stitches when appropriate for the pattern.
Final Thoughts
Learning how to crochet a magic ring opens the door to a huge range of crochet projects.
The technique can be reduced to one simple sequence:
Create the loop → Insert the hook → Pull up the working yarn → Secure → Crochet into the ring → Pull the tail closed
Don’t worry if your first few attempts look messy. Focus first on understanding which strand is the working yarn, which is the tail, and where your hook needs to go.
Once those movements become familiar, you’ll be ready to use the magic ring for circles, balls, flowers, hats, granny motifs, and especially amigurumi.