
If you’re learning crochet for the first time, the slip knot is the perfect place to start.
A slip knot creates the adjustable loop that sits on your crochet hook before you make your first chain stitches. It takes only a few seconds once you understand how the yarn should move.
In this tutorial, you’ll learn how to make a slip knot for crochet step by step, how tight it should be, how to tell whether you’ve made it correctly, and what to do next.
What Is a Crochet Slip Knot?
A slip knot is an adjustable knot used at the beginning of most traditional crochet projects.
Once it is placed on your crochet hook, you can gently pull the working yarn to make the loop smaller or larger.
The Craft Yarn Council teaches the slip knot as one of the first crochet skills, followed by the foundation chain and single crochet.
One important beginner rule
The slip knot does not count as a crochet stitch.
So if a pattern says:
Ch 10
you make your slip knot first and then crochet 10 chain stitches. You don’t count the slip knot as one of those ten.
What You Need
You only need:
- Yarn
- A crochet hook
For your first attempt, I recommend using a smooth, light-colored medium-weight yarn.
Very dark, fuzzy or textured yarn can make it harder to see what the strands are doing.
Know Your Yarn Before Starting
This small detail makes the instructions much easier to understand.
Working Yarn
The working yarn is the strand connected to your ball or skein of yarn.
Yarn Tail
The tail is the short loose end.
You’ll use both when forming your slip knot.
How to Make a Slip Knot for Crochet Step by Step
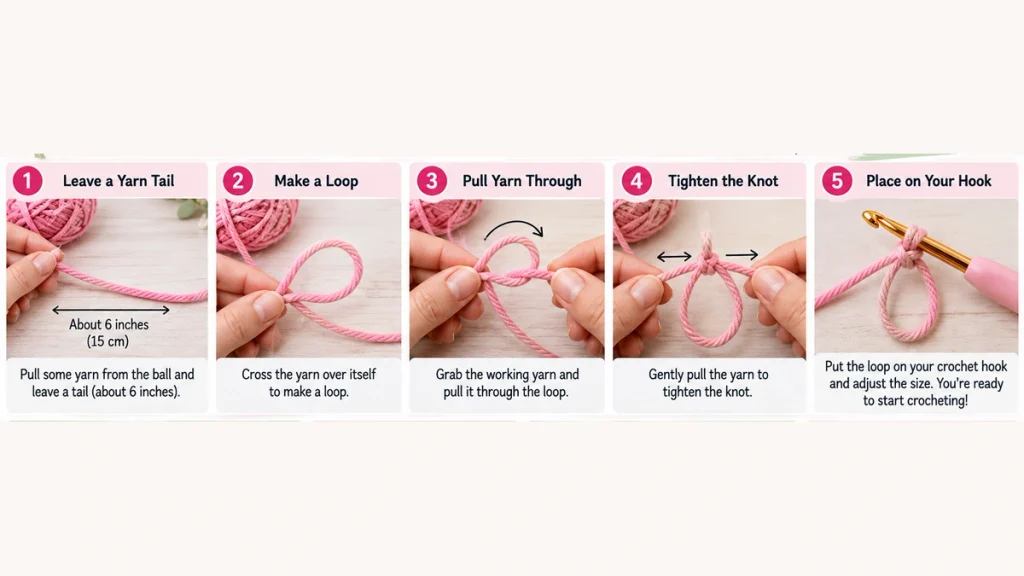
Step 1: Leave a Yarn Tail
Pull some yarn from the ball and leave approximately 6 inches (15 cm) as a comfortable tail to work with.
The exact length isn’t critical for simply practicing the knot.
Step 2: Make a Loop
Lay the yarn in front of you.
Cross one section of yarn over the other to create a loop.
You should now have:
one loop + working yarn + yarn tail.
Step 3: Pull Yarn Through the Loop
Reach through the loop and grab a section of the working yarn.
Pull a small loop of that working yarn through your original loop.
Don’t pull it all the way through.
You should now see a new adjustable loop.
Step 4: Tighten the Knot
Hold the new loop while gently pulling the yarn to form the knot underneath it.
You have now made a slip knot.
Step 5: Put It on Your Crochet Hook
Insert your crochet hook through the adjustable loop.
Pull the working yarn gently until the loop fits comfortably around the shaft of your hook.
That’s it.
Your crochet hook is ready for the first chain stitch.
The 5-Second Slip Knot Formula
Once you’ve practiced it a few times, remember:
Loop → Pull Through → Tighten → Insert Hook → Adjust
That’s the entire technique.
How Tight Should a Crochet Slip Knot Be?
This is where many beginners make their first mistake.
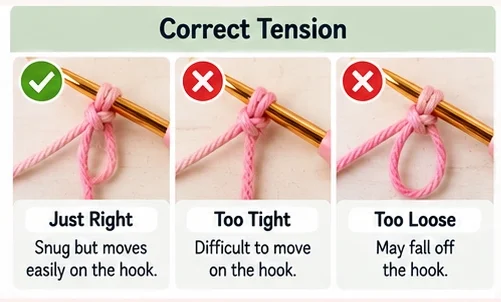
Your slip knot should be snug, but not tight.
The loop needs to sit securely around your hook while still sliding along the shaft.
Too tight?
You’ll struggle to move the hook and make your first chain.
Too loose?
The loop may feel unstable and make it harder to control your yarn.
Aim for a loop that moves smoothly without falling off the hook.
How Do You Know Your Slip Knot Is Correct?
Here’s a simple test.
With the slip knot on your hook, gently pull the working yarn.
The loop around the hook should become smaller.
Then loosen it again slightly.
A properly made slip knot is adjustable.
If your knot won’t adjust at all, you’ve probably made a fixed knot rather than a slip knot.
An Easy Alternative: Make the Slip Knot on Your Finger
Some beginners find this method easier.
- Wrap the yarn around your index finger to create a loop.
- Cross the strands.
- Pull the working yarn through the loop.
- Remove the new loop from your finger.
- Insert your crochet hook.
- Pull the working yarn gently to adjust it.
The final result should be the same: an adjustable loop on your hook.
Common Slip Knot Mistakes
| Problem | Likely Cause | Fix |
|---|---|---|
| Knot won’t slide | Fixed knot made accidentally | Start again and pull a loop through the first loop |
| Loop is extremely tight | Working yarn pulled too hard | Loosen it before chaining |
| Loop keeps falling off | Knot is too loose | Gently pull working yarn |
| First chain is difficult | Slip knot is tight against hook | Leave room for hook movement |
| You counted the knot | Beginner counting mistake | Slip knot isn’t a crochet stitch |
Slip Knot vs. Slip Stitch: They’re Not the Same
This distinction can save beginners a lot of confusion.
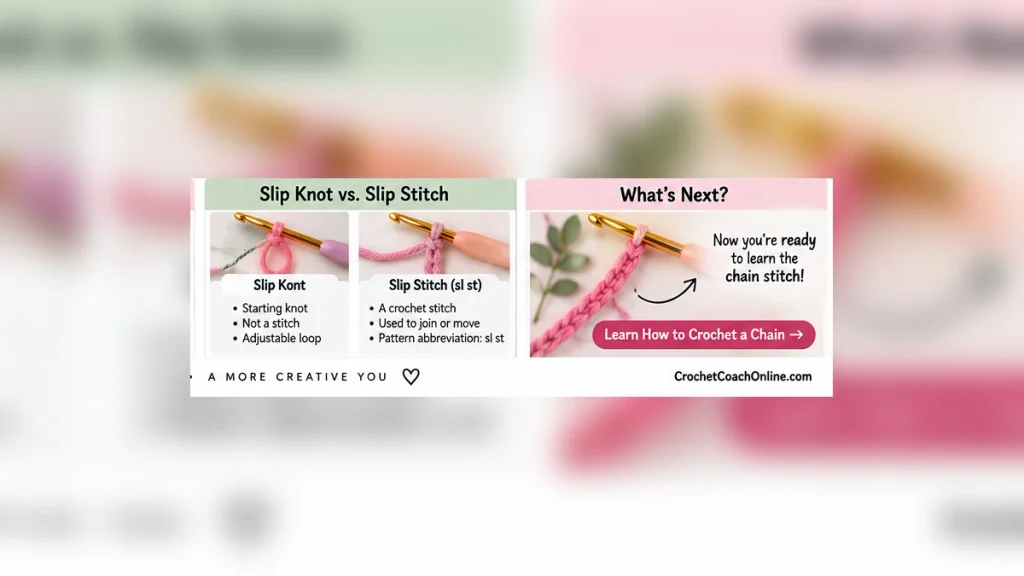
A slip knot is normally used to place the first adjustable loop on your crochet hook.
A slip stitch (sl st) is an actual crochet technique used while crocheting—for example, to join work or move across stitches.
The Craft Yarn Council lists sl st as the standard abbreviation for slip stitch and separately explains making the initial slip knot before beginning the foundation chain.
So:
Slip knot = starting knot
Slip stitch = crochet stitch/technique
Does the Slip Knot Count as a Stitch?
No.
This deserves repeating because it’s a very common beginner question.
The Craft Yarn Council specifically states that the starting slip knot is not counted as a stitch.
For example:
Pattern says:
Ch 15
You make:
Slip knot + 15 chains
Not:
Slip knot + 14 chains
That small counting mistake can affect the rest of your project.
What Comes After the Slip Knot?
Once your slip knot is comfortably sitting on your hook, you’re ready to learn the chain stitch.
The basic sequence is:
Slip Knot → Foundation Chain → First Crochet Stitches
The Craft Yarn Council’s beginner teaching material follows this same progression: slip knot, foundation chain, single crochet and turning chain.
Quick Beginner Practice
Before moving to chain stitches, make and undo the slip knot about 5–10 times.
Your goal isn’t speed.
Try to recognize:
the loop → the working yarn → the tail → the adjustable knot.
Once you can make it without thinking too much about every movement, move on to your first foundation chain.
Frequently Asked Questions
Is a slip knot the first step in crochet?
For many traditional crochet projects, yes. You create the slip knot on your hook and then begin the foundation chain. Crochet patterns may assume you already know to make it rather than explicitly telling you each time.
Does a crochet slip knot count as a chain?
No. The slip knot itself is not counted as a chain stitch.
Why won’t my slip knot tighten?
You may have pulled the wrong strand through your original loop or created a fixed knot. Undo it and remake the loop slowly.
Should a crochet slip knot be tight?
It should be snug enough to stay on your hook but loose enough for the hook and yarn to move comfortably.
What do I do after making a slip knot?
The natural next skill is the foundation chain, followed by basic stitches such as single crochet.
Is a slip knot the same as a magic ring?
No. A slip knot usually creates the starting loop on your hook. A magic ring is an adjustable starting method commonly used for projects worked in the round, such as amigurumi.
Final Thoughts
Learning how to make a slip knot for crochet may seem like a tiny step, but it’s the starting point for many crochet projects.
Remember the simple sequence:
Make a loop → pull the working yarn through → tighten → place it on your hook → adjust.
Don’t make it too tight, and don’t count the slip knot as your first stitch.
Once your loop moves comfortably on the hook, you’re ready for the next beginner skill: making your first crochet chain.
[…] If you’re still learning the basics, you may want to review How to Make a Slip Knot for Crochet before beginning. Slip Knot Crochet Tutorial […]