
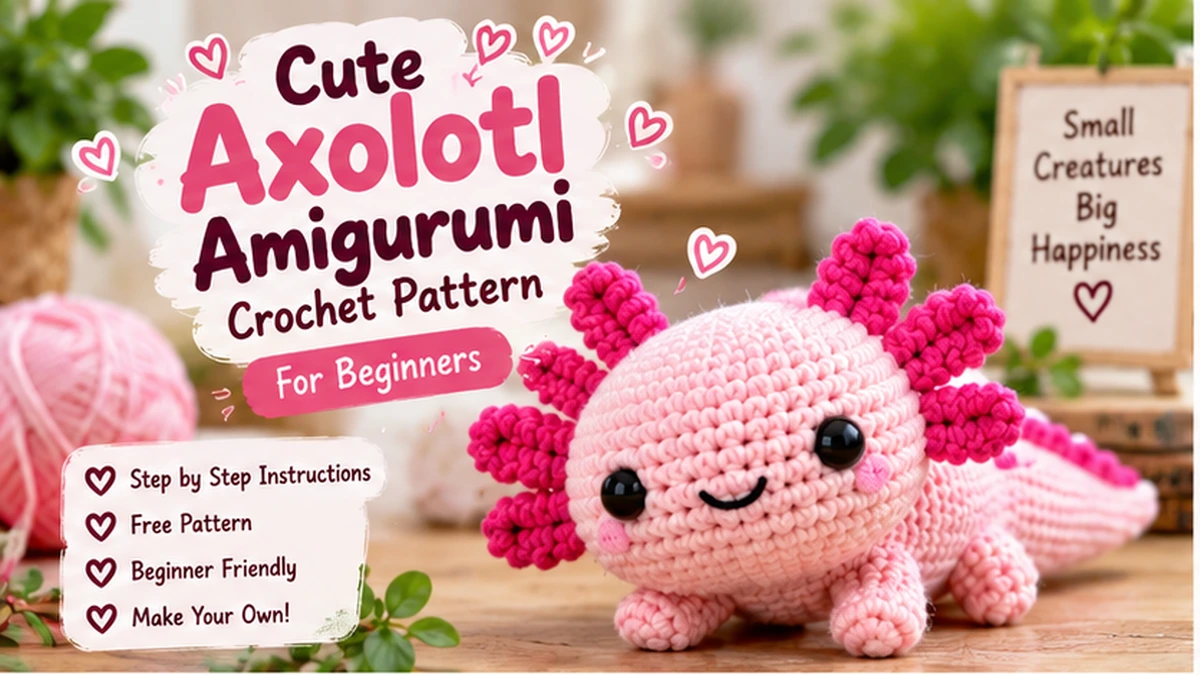
Axolotls might be unusual little creatures, but that is exactly what makes them perfect for amigurumi.
Their round heads, tiny legs, long tails and colorful external gills create an instantly recognizable crochet character—and you can make one using mostly beginner-friendly stitches.
In this free axolotl amigurumi pattern, you’ll crochet a cute pink axolotl step by step, including the head, body, tail, legs and six signature gills.
Once you understand the basic construction, you can customize yours with different colors, yarn weights and facial expressions.
Axolotl Amigurumi Pattern at a Glance
| Detail | Pattern Info |
|---|---|
| Skill Level | Beginner / Advanced Beginner |
| Terminology | US Crochet Terms |
| Main Stitch | Single Crochet |
| Construction | Continuous rounds |
| Approx. Time | 2–3 hours |
| Main Yarn Color | Light pink |
| Accent Color | Dark pink |
| Hook | 3.0–3.5 mm |
| Pattern Type | Amigurumi |
Your finished size will vary depending on the yarn, hook, tension and stuffing you use.
Materials You’ll Need
For this axolotl amigurumi, prepare:
- Light pink yarn
- Dark pink yarn for the gills
- Black embroidery yarn
- 3.0–3.5 mm crochet hook
- Polyester fiberfill
- Yarn needle
- Scissors
- Stitch marker
- Pins
- Optional safety eyes
Cotton or smooth acrylic yarn is particularly beginner-friendly because the individual stitches are easy to see.
If you want a soft, chunky plushie instead, chenille yarn is another popular option. Current beginner axolotl patterns commonly offer both cotton and plush/chenille versions.
Crochet Abbreviations
This pattern uses US crochet terminology.
| Abbreviation | Meaning |
|---|---|
| MR | Magic Ring |
| sc | Single Crochet |
| inc | Increase |
| dec | Decrease |
| ch | Chain |
| sl st | Slip Stitch |
| st | Stitch |
| sts | Stitches |
| FO | Fasten Off |
Before You Start
Work in continuous rounds unless the instructions say otherwise.
Place a stitch marker in the first stitch of every round.
Move the marker upward as you crochet.
The number shown in parentheses at the end of each round is the total number of stitches you should have.
For example:
(2 sc, inc) × 6 (24)
means repeat 2 single crochet, then one increase six times. You should finish with 24 stitches.
Step 1: Crochet the Axolotl Head
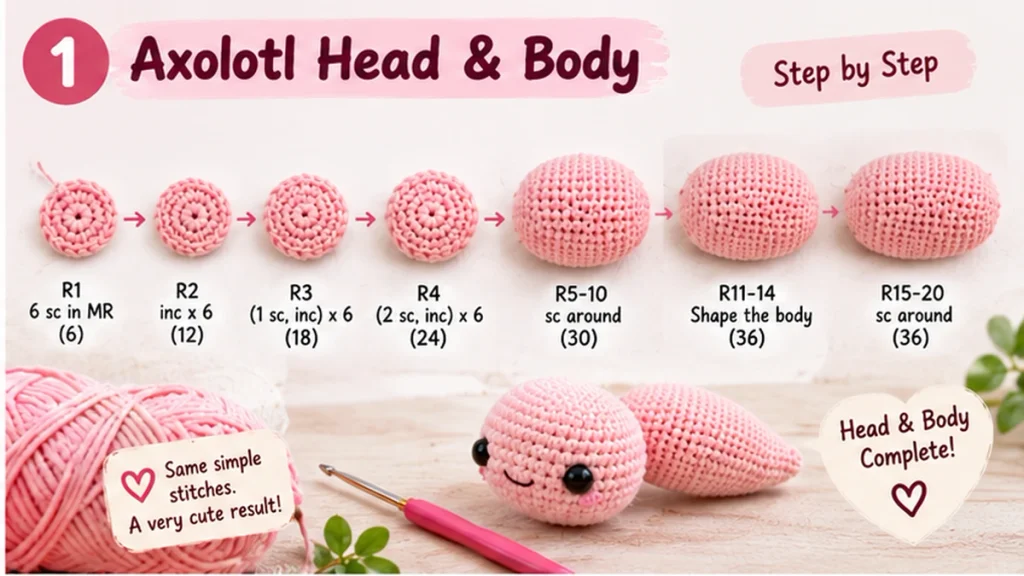
Use light pink yarn.
Round 1
6 sc into MR (6)
Pull the magic ring closed.
Round 2
inc × 6 (12)
Round 3
(1 sc, inc) × 6 (18)
Round 4
(2 sc, inc) × 6 (24)
Round 5
(3 sc, inc) × 6 (30)
Rounds 6–10
sc around (30)
You should now have a rounded head.
Don’t stuff yet.
Step 2: Add the Eyes
Position the eyes approximately between Rounds 7 and 8.
Before securing them, check the face from directly in front.
Try moving the eyes slightly closer together or farther apart until you like the expression.
If you’re using embroidered eyes, you can add them later.
Safety note
For toys intended for children under three, avoid plastic safety eyes because small components can pose a choking risk. Embroidered eyes are a better choice for these projects. This warning is also explicitly included in established beginner axolotl tutorials.
Step 3: Shape the Neck and Body
Round 11
(3 sc, dec) × 6 (24)
Round 12
sc around (24)
Round 13
(3 sc, inc) × 6 (30)
Round 14
(4 sc, inc) × 6 (36)
Rounds 15–20
sc around (36)
Begin stuffing the head.
Add small pieces of fiberfill gradually rather than pushing in one large clump.
Continue stuffing into the body as you work.
Step 4: Shape the Back of the Body
Round 21
(4 sc, dec) × 6 (30)
Round 22
(3 sc, dec) × 6 (24)
Round 23
(2 sc, dec) × 6 (18)
Add more stuffing.
Round 24
(1 sc, dec) × 6 (12)
Don’t close the body completely yet—we’ll transition toward the tail.
Step 5: Crochet the Tail
The tail is one of the features that separates an axolotl from a generic pink amigurumi animal.
Continue with light pink yarn.
Rounds 25–27
sc around (12)
Round 28
(1 sc, dec) × 4 (8)
Rounds 29–31
sc around (8)
Add only a small amount of stuffing toward the base of the tail.
Round 32
dec × 4 (4)
Fasten off and close the remaining opening.
You can gently curve the tail to one side while shaping.
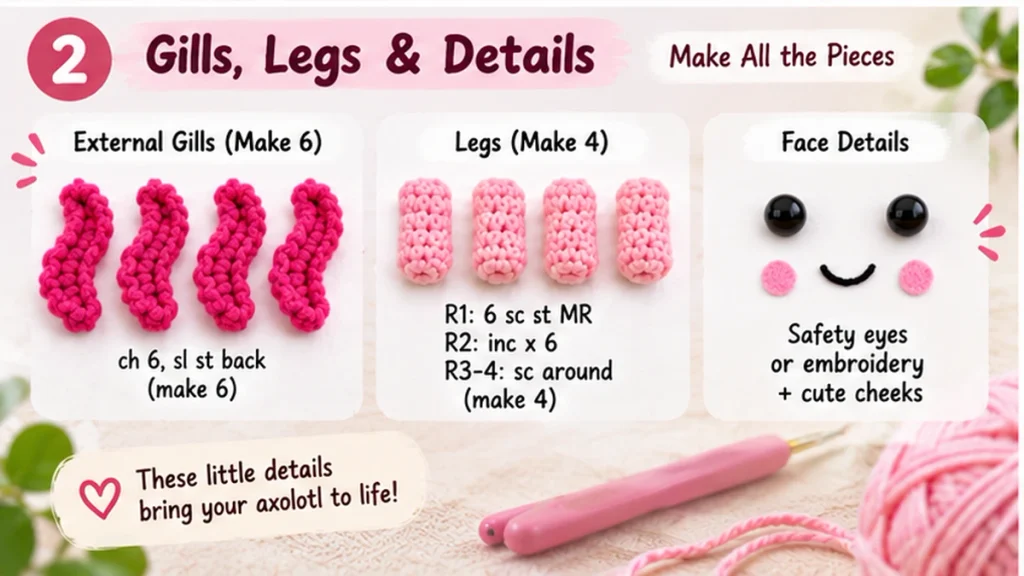
Step 6: Crochet the External Gills — Make 6
The feathery external gills are the visual signature of an axolotl.
Use your dark pink yarn.
For each gill:
ch 6
Starting in the second chain from the hook:
sl st in each chain back toward the beginning.
Fasten off, leaving a long tail for sewing.
Make six gills total.
We’ll attach three to each side of the head.
Want fluffier gills?
You can experiment with slightly longer chains or decorative branching.
Just keep both sides reasonably symmetrical.
Step 7: Attach the Gills
Place three gills on each side of the head.
Arrange them roughly like a fan:
Upper gill ↗
Middle gill →
Lower gill ↘
Pin all six before sewing.
Look at the axolotl from the front.
Adjust until both sides appear balanced.
Then sew each gill securely into place.
This step makes the biggest visual difference to the finished character.
Step 8: Crochet the Legs — Make 4
Use light pink yarn.
Round 1
6 sc into MR (6)
Round 2
inc × 6 (12)
Rounds 3–4
sc around (12)
Add a very small amount of stuffing.
Fasten off, leaving a long tail.
Repeat until you have four legs.
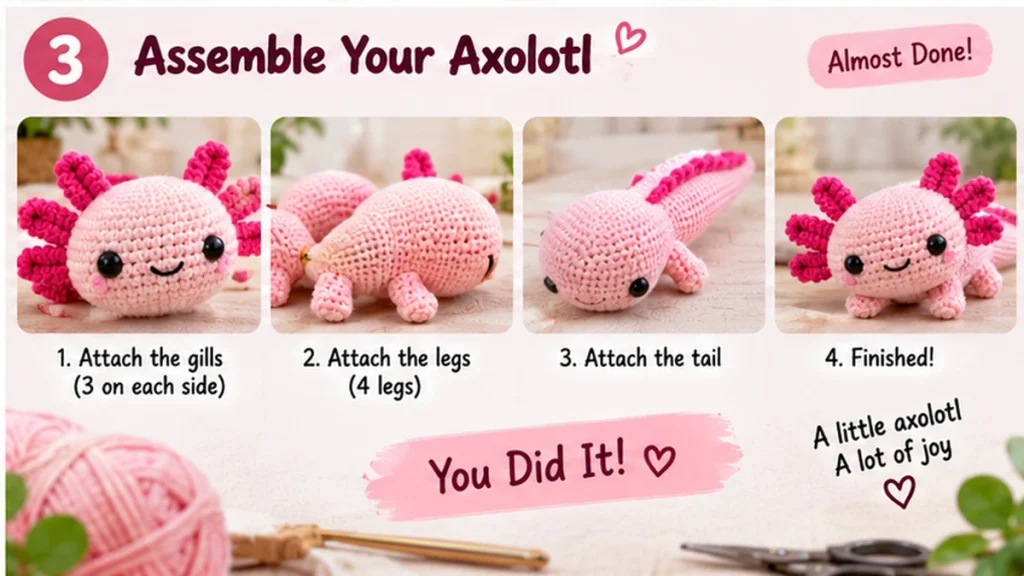
Step 9: Attach the Legs
Pin two legs toward the front of the body and two toward the back.
Don’t sew immediately.
Place the axolotl on a flat surface first.
Check:
- Are the front legs level?
- Are the back legs symmetrical?
- Does the body sit naturally?
- Does the tail have enough room?
Once you’re satisfied, sew each leg firmly to the body.
Step 10: Embroider the Smile
Use black embroidery yarn.
A tiny curved or simple straight mouth works beautifully.
Avoid making it too large.
The eyes and colorful gills already provide most of the character.
You can also add tiny pink cheek stitches if you want an extra-cute expression.
Your Finished Axolotl Amigurumi
You should now have:
✓ Rounded head
✓ Plump body
✓ Long tapered tail
✓ Four tiny legs
✓ Six colorful gills
✓ Cute embroidered smile
Your axolotl doesn’t need to look identical to anyone else’s.
Small differences in tension, stuffing and facial placement are part of what makes handmade amigurumi interesting.
Make a Plush Axolotl
Want something larger and squishier?
Try plush or chenille yarn.
This isn’t just a theoretical variation: current axolotl patterns use chunky chenille for larger plush versions, while thinner cotton/sport yarn can create mini versions from similar construction ideas.
When changing yarn weight, also adjust your hook appropriately.
Remember that thicker yarn changes:
- Finished size
- Stuffing requirements
- Eye size
- Stitch visibility
- Overall firmness
Keep the fabric dense enough that the stuffing doesn’t show through.
5 Axolotl Color Ideas
You don’t have to stick with the classic pink combination.
1. Classic Pink
Light pink body + dark pink gills.
2. Lavender Dream
Lavender body + purple gills.
3. Blue Axolotl
Pastel blue body + darker blue gills.
4. Strawberry Axolotl
Cream body + red/pink gills + embroidered strawberry details.
5. Fantasy Axolotl
Use rainbow, speckled or multicolored yarn.
This is one of the advantages of amigurumi: you’re creating a character, not a scientific model.
How to Make a Mini Axolotl
Use thinner yarn and a smaller compatible hook.
The same general concept can create a small keychain-sized project.
Mini axolotls are already a proven format in current pattern communities: one free Ribblr pattern specifically targets a tiny beginner-friendly no-sew axolotl, while another established pattern can be made as either a sport-weight mini/keychain or a larger chenille version.
If adding a keychain attachment, make sure it is secured firmly.
What About a No-Sew Axolotl?
No-sew is worth mentioning because it is clearly an important part of current axolotl crochet search intent.
Current patterns from Nicki’s Homemade Crafts and Ribblr specifically position their axolotls as beginner-friendly no-sew projects, while Lucy the Axolotl is described as an easy, almost-no-sew project taking roughly 1–2 hours.
Our pattern uses separate pieces because it’s easier to explain positioning and customization to a beginner.
Once you’re comfortable with amigurumi construction, a no-sew version would be an excellent next project.
And importantly for our content strategy: we can publish a separate “No-Sew Axolotl Crochet Pattern” later instead of forcing both search intents into one article.
8 Common Axolotl Amigurumi Mistakes
1. Forgetting the Stitch Marker
Continuous rounds can become confusing very quickly.
Mark every round.
2. Incorrect Stitch Counts
Count at the end of each shaping round.
One missed increase can affect everything that follows.
3. Gills Aren’t Symmetrical
Pin all six before sewing any permanently.
4. Overstuffing
Too much stuffing stretches the stitches and can distort the body.
5. Understuffing the Head
The head should hold its rounded shape.
6. Tail Is Too Stiff
Use less stuffing toward the tip.
7. Legs Are Uneven
Pin them and test the axolotl on a flat surface before sewing.
8. Hook Is Too Large
If you can clearly see stuffing through the stitches, try a smaller hook.
Axolotl Amigurumi FAQ
Is an axolotl amigurumi good for beginners?
Yes. Many current axolotl patterns are explicitly designed for beginners and rely heavily on familiar amigurumi skills such as the magic ring, single crochet, increases and decreases.
How long does an axolotl take to crochet?
It depends on the pattern and your experience. For this version, allow around 2–3 hours. Some simplified almost-no-sew versions advertise approximately 1–2 hours.
What yarn should I use?
Smooth cotton or acrylic is easy to see and control. Chenille is excellent for a soft plush appearance but can be harder for a complete beginner to read stitch-by-stitch.
How many gills does the crochet axolotl need?
Our design uses six external gills—three on each side of the head.
Can I make it without safety eyes?
Absolutely. Embroider the eyes using black yarn or embroidery thread.
Can I make a no-sew axolotl?
Yes. No-sew axolotl construction is already popular among current beginner patterns, where limbs and gills can be incorporated during crocheting rather than attached afterward.
More Amigurumi Ideas
If you enjoyed this project, don’t stop here.
Try our Easy Capybara Amigurumi Crochet Pattern for Beginners next.
Or explore 15 Unique Amigurumi Ideas to Crochet in 2026 to find frogs, mushrooms, mini animals, keychains and other creative projects.
These internal links are particularly useful now because we’re building a proper Amigurumi content cluster instead of publishing unrelated articles.
Final Thoughts
This axolotl amigurumi pattern gives you a project that looks distinctive without requiring dozens of advanced crochet techniques.
Focus on accurate stitch counts, even tension and careful placement of those six colorful gills.
Once you’ve finished your first one, change the colors, yarn thickness or expression and make the next axolotl completely your own.