
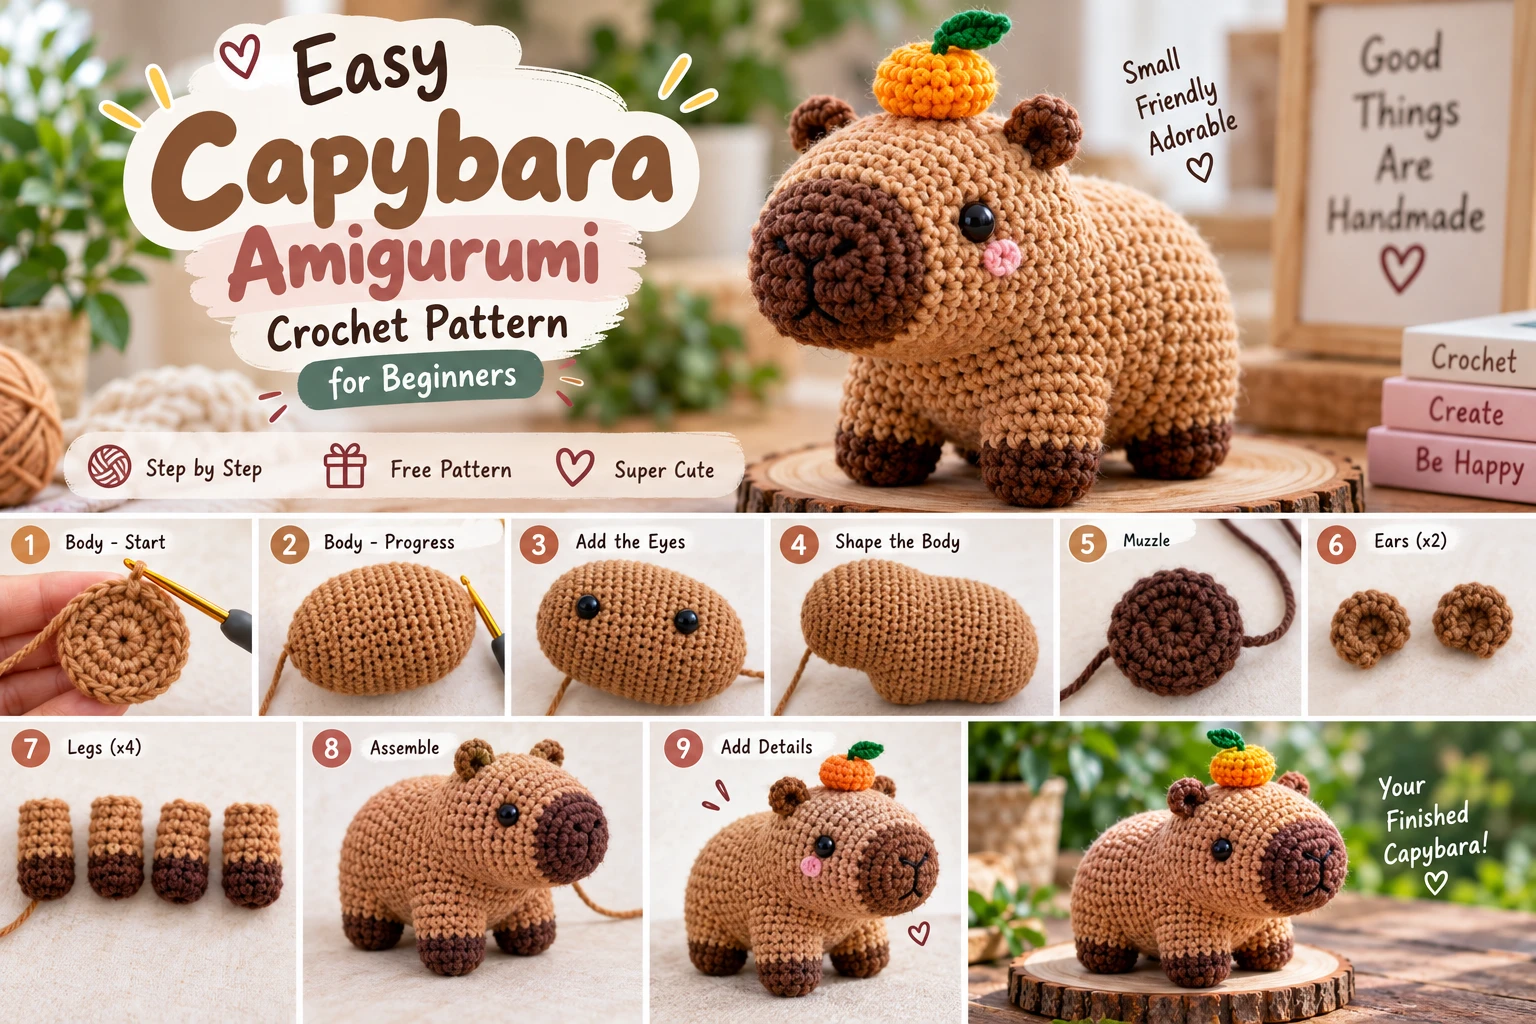
Capybaras may be famous for being some of the calmest-looking animals around, but they also make ridiculously cute crochet projects.
With their rounded bodies, tiny ears, short legs and distinctive dark muzzle, capybaras translate perfectly into amigurumi.
In this beginner-friendly guide, you’ll learn how to crochet a small capybara amigurumi using simple stitches and straightforward shaping.
The finished capybara makes a cute desk companion, handmade gift, nursery decoration or addition to your amigurumi collection.
Capybara Amigurumi Pattern at a Glance
| Detail | Pattern Info |
|---|---|
| Skill Level | Beginner / Advanced Beginner |
| Crochet Terms | US |
| Main Stitch | Single Crochet |
| Construction | Continuous rounds |
| Approx. Time | 2–3 hours |
| Yarn | Worsted/medium yarn |
| Hook | 3.0–3.5 mm |
| Main Color | Warm brown |
| Pattern Type | Amigurumi animal |
Note: Your finished size will vary depending on yarn weight, hook size, tension and stuffing.
Materials You’ll Need
Prepare:
- Brown yarn for the body
- Dark brown yarn for the muzzle
- Small amount of black yarn for facial details
- 3.0–3.5 mm crochet hook
- Polyester fiberfill
- Yarn needle
- Scissors
- Stitch marker
- Pins
- Optional safety eyes
A stitch marker is particularly useful because we’ll work much of the capybara in continuous rounds.
Crochet Abbreviations
This pattern uses US crochet terminology.
| Abbreviation | Meaning |
|---|---|
| MR | Magic Ring |
| ch | Chain |
| sc | Single Crochet |
| inc | Increase — 2 sc in one stitch |
| dec | Decrease |
| st | Stitch |
| sts | Stitches |
| sl st | Slip Stitch |
| FO | Fasten Off |
You can compare the standard crochet abbreviations with the terminology published by the Craft Yarn Council.
Craft Yarn Council Crochet Abbreviations
Before You Start
There are three things that will make this pattern much easier.
Work in continuous rounds
Unless otherwise stated, don’t join each round with a slip stitch.
Place a stitch marker into the first stitch of every round and move it upward as you work.
Keep your stitches fairly tight
Amigurumi needs a dense fabric so that the stuffing doesn’t show through large gaps.
You don’t need painfully tight tension—just an even fabric without obvious holes.
Stuff gradually
Don’t wait until the final round to force all the stuffing inside.
Add small amounts as the body closes.
How to Crochet the Capybara Body and Head
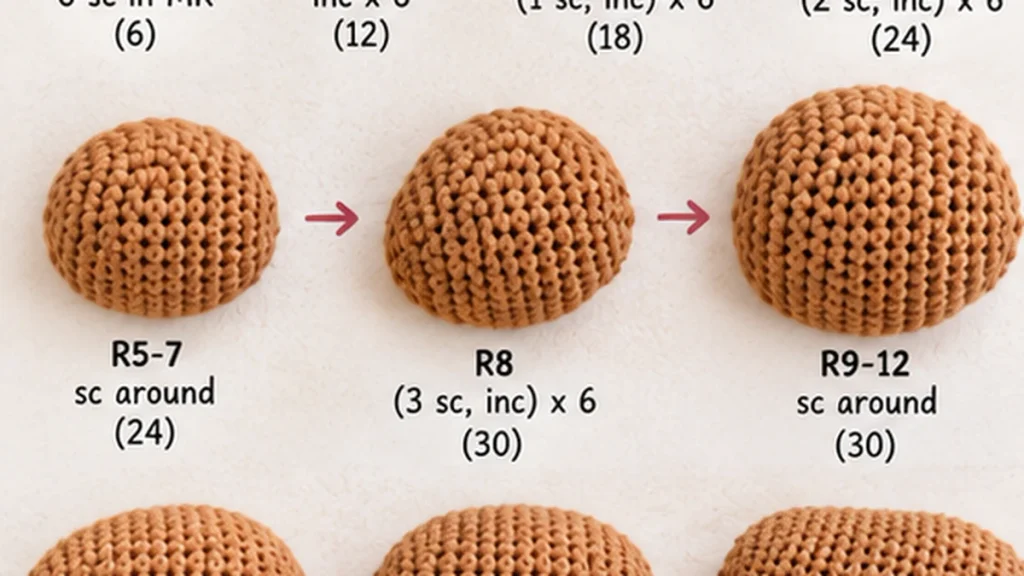
We’ll start at the front of the head and gradually create the elongated body shape.
Use your main warm brown yarn.
Round 1
Make a magic ring and work:
6 sc into MR (6)
Pull the ring closed.
Round 2
inc × 6 (12)
You should now have 12 stitches.
Round 3
(1 sc, inc) × 6 (18)
Round 4
(2 sc, inc) × 6 (24)
Rounds 5–7
sc around (24)
This begins forming the head.
Round 8
(3 sc, inc) × 6 (30)
Rounds 9–12
sc around (30)
At this point you should see a rounded but slightly elongated shape beginning to form.
Add the Eyes
Position the eyes approximately between Rounds 6 and 7.
Before permanently securing them, look at the face from the front.
The eyes should appear symmetrical.
For a sweeter expression, don’t position them too far apart.
Important Safety Note
Plastic safety eyes contain small components.
For amigurumi intended for babies or very young children, use embroidered facial features instead of removable plastic pieces.
Shape the Body
Continue using the main brown yarn.
Round 13
(4 sc, inc) × 6 (36)
Rounds 14–20
sc around (36)
These rounds create the capybara’s long, rounded body.
Don’t worry if it looks slightly cylindrical right now—the stuffing will help define its final shape.
Start Stuffing
Begin adding fiberfill.
Start at the head and push small pieces into the front.
Continue gradually toward the body.
Don’t overstuff.
Too much stuffing can:
- Stretch the stitches
- Create visible gaps
- Distort the shape
- Make the capybara unusually stiff
You want it firm but still slightly squeezable.
Close the Back of the Body
Round 21
(4 sc, dec) × 6 (30)
Round 22
(3 sc, dec) × 6 (24)
Add more stuffing.
Round 23
(2 sc, dec) × 6 (18)
Round 24
(1 sc, dec) × 6 (12)
Finish stuffing and check the overall shape.
Round 25
dec × 6 (6)
Fasten off, leaving a tail.
Thread the tail through the remaining stitches and pull gently to close.
Weave in the end.
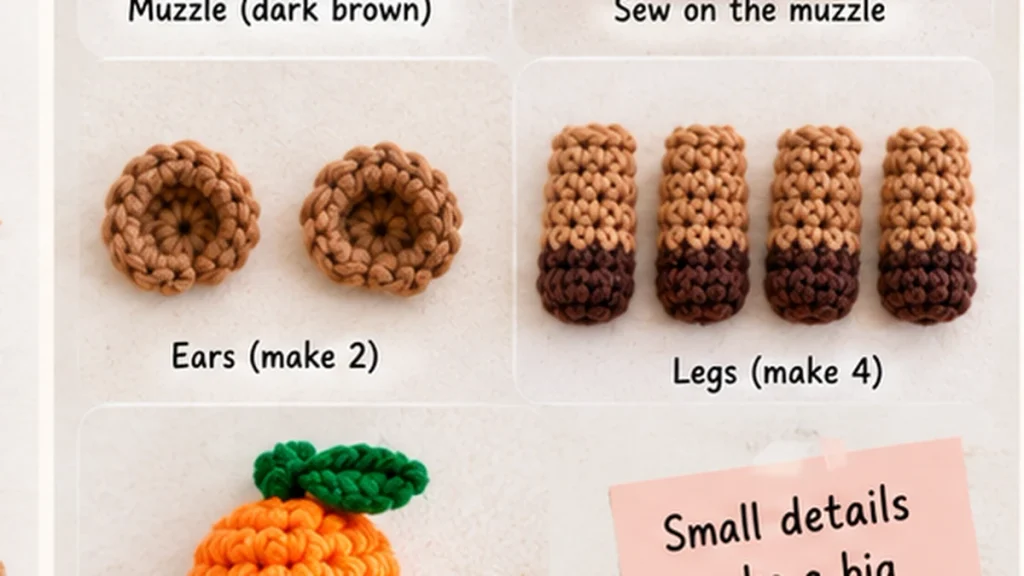
Crochet the Capybara Muzzle
The muzzle is one of the most important details.
Without it, your little capybara can easily start looking like a bear.
Use dark brown yarn.
Round 1
6 sc into MR (6)
Round 2
inc × 6 (12)
Round 3
sc around (12)
Fasten off, leaving a long tail for sewing.
Add only a tiny amount of stuffing.
Position the muzzle low on the front of the face.
Pin it first.
When you’re happy with the position, sew securely around the edge.
Add the Nose
Using black yarn, embroider a small nose in the center of the dark muzzle.
A simple small oval or horizontal shape works well.
Add one short vertical stitch beneath it if you want a more expressive face.
Keep the embroidery minimal.
Capybaras naturally have a wonderfully simple expression.
Crochet the Ears — Make 2
Use the main brown yarn.
Round 1
6 sc into MR (6)
Round 2
sc around (6)
Fasten off and leave a tail for sewing.
Don’t stuff the ears.
Flatten each one slightly.
Sew them onto the top sides of the head.
Before sewing permanently, pin both ears and look at the capybara from the front.
Tiny changes in ear position can dramatically change the expression.
Crochet the Legs — Make 4
Use brown yarn.
Round 1
6 sc into MR (6)
Round 2
inc × 6 (12)
Rounds 3–4
sc around (12)
Add a very small amount of stuffing.
Fasten off and leave a tail for sewing.
Repeat until you have four legs.
Attach the Legs
Place two legs toward the front of the body and two toward the back.
Pin all four before sewing.
Place the capybara on a flat surface.
Does it sit correctly?
If one side tilts, adjust the legs before sewing.
Once you’re satisfied, sew each leg securely to the body.
Optional: Add Tiny Toes
Use dark brown or black yarn.
Make 2–3 tiny straight embroidery stitches at the end of each foot.
This is optional, but it adds a surprising amount of character.
Give Your Capybara an Orange 🍊
Want the recognizable cute capybara aesthetic?
Make a tiny orange accessory.
Use orange yarn.
Round 1
6 sc into MR (6)
Round 2
inc × 6 (12)
Rounds 3–4
sc around (12)
Round 5
dec × 6 (6)
Add a tiny amount of stuffing before closing.
Fasten off.
Using green yarn, embroider or crochet a tiny leaf at the top.
You can place the orange loosely on your capybara’s head for photos or stitch it securely in place.
Your Finished Capybara
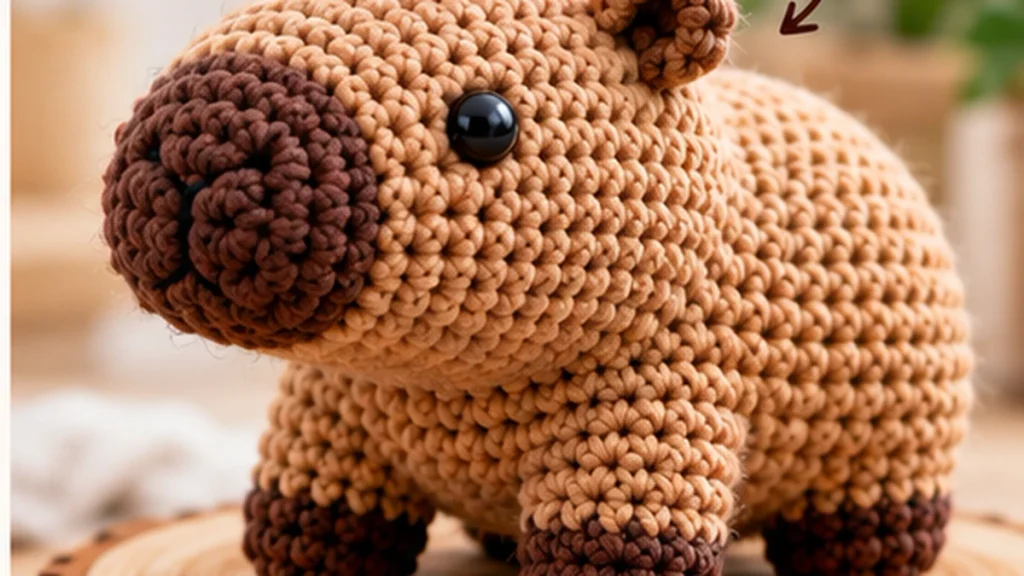
You should now have a small crochet capybara with:
✓ Rounded head
✓ Long body
✓ Dark muzzle
✓ Tiny rounded ears
✓ Four short legs
✓ Simple friendly face
And possibly a tiny orange sitting on its head.
Don’t worry if yours doesn’t look exactly like another crocheter’s.
Different tension, yarn and stuffing naturally change the final proportions.
That’s part of handmade crochet.
How to Make a Plush Capybara Instead
Prefer the chunky plushies you often see in amigurumi inspiration?
Use chenille or plush yarn with an appropriately sized hook.
Current capybara patterns frequently use chenille, velvet or chunky yarn to produce that soft, rounded plush appearance. For example, HUGurumi’s no-sew version uses chenille yarn, while other current patterns use chunky yarn with larger hooks.
However, switching yarn can change:
- Finished size
- Stitch visibility
- Eye size required
- Amount of stuffing
- Hook size
Follow the recommendations on your yarn label and make sure the fabric remains dense enough to hold stuffing.
7 Common Capybara Amigurumi Mistakes
1. Losing Track of the Round
Use a stitch marker.
One missed increase or decrease can affect the shape several rounds later.
2. Making the Muzzle Too High
A lower, prominent muzzle helps create the recognizable capybara face.
3. Overstuffing
Firm doesn’t mean rock-hard.
Add stuffing gradually.
4. Sewing Before Pinning
Always pin the ears, muzzle and legs first.
Check the character from multiple angles.
5. Using a Hook That’s Too Large
Large gaps may expose the stuffing.
Try a smaller hook if the fabric looks too open.
6. Uneven Eye Placement
Check your eye position before locking safety eyes into place.
7. Ignoring Stitch Counts
The number in parentheses at the end of each round is your checkpoint.
For example:
(2 sc, inc) × 6 (24)
means you should finish that round with 24 stitches.
Can Beginners Crochet a Capybara?
Yes—provided you already understand a few basic amigurumi techniques.
The essential skills are:
Magic ring → single crochet → increase → decrease → working in rounds → basic sewing.
Current capybara patterns range from beginner to intermediate depending on their construction. Simpler versions minimize sewing, while others introduce bobble stitches, color changes, FLO/BLO or other techniques.
For your first attempt, simple construction is usually better than adding complicated details.
How Long Does a Capybara Amigurumi Take?
For this version, allow roughly 2–3 hours if you’re comfortable with basic crochet.
A complete beginner may need longer.
Very small no-sew designs can be considerably faster: one recent Pocket Capybara tutorial is specifically designed as a quick beginner project, while another free Ribblr design estimates around an hour.
Speed isn’t important on your first one.
Accurate stitch counts are.
Capybara Amigurumi FAQ
What yarn is best for capybara amigurumi?
Medium cotton or acrylic yarn is easier for beginners because the stitches are relatively easy to see. Plush or chenille yarn creates a softer stuffed-toy appearance but can make individual stitches harder to identify.
What color should a crochet capybara be?
Warm brown, caramel, tan and mustard-brown all work well. Use a darker shade for the muzzle and optional foot details.
Can I make the capybara bigger?
Yes. Using thicker yarn and an appropriately larger hook can produce a larger finished piece without rewriting every round, although proportions and firmness can change.
Why can I see stuffing between my stitches?
Your hook may be too large, your tension may be too loose, or the toy may be overstuffed.
Do I need safety eyes?
No.
Black yarn can be used to embroider the eyes, which is also preferable for projects intended for very young children.
What is the easiest capybara amigurumi style?
A simple small design with few separate pieces is generally easier. No-sew designs are also popular because they reduce assembly, although some use special stitches that can raise the difficulty.
Final Thoughts
A capybara amigurumi is a fun way to move beyond basic crochet practice and create something you can actually display, gift or keep.
Don’t aim for absolute perfection on your first attempt.
Focus on:
even stitches, accurate counting, gradual stuffing and careful placement of the face.
Once you’ve made the basic version, customize the next one.
Give it an orange, tiny flower, scarf, hat or even make an entire capybara family.
And if you’re looking for more inspiration, explore our 15 Unique Amigurumi Ideas to Crochet in 2026 for your next project.
[…] Easy Capybara Amigurumi Crochet Pattern for Beginners […]